Joint Venture with Karen Miller: Mystery Quilt Along – Part 3


Jan 7: Announcement post
Jan 21:  Planning, basting, batting, etc
Jan 28:  Stabilization quilting or just to catch up
***Feb 4, Feb 11: Inside center panel
Feb 25: Top and Bottom Rectangles
March 4: Top and Bottom Squares
March 11: Left and Right Side panels
Mach 18: Narrow Sashing
March 25: Outside (wider) Border
April 1: Binding & Hanging

***

Hello Friends, Happy Monday!  I hope your week got off a great start, and that those of you who lived in last week’s extreme cold have thawed out nicely, and are ready to do some quilting on your machine.

Now, some of you might still be gathering your supplies.  That’s okay — jump in when you are able to. Click HERE where Karen keeps a list of shops where you can purchase the supplies.

2019c

I have heard positive responses from many regarding my book.  THANK YOU!

You may order my book from:

Connecting Threads

Fox Chapel Publishing

Amazon

or email me for signed copies!

I will be using Aurifli 50 wt threads from my Subtle Strings collection.  You may read more about the collection here, and here.  You may order your collection here for $99.99 (regularly selling for $140)!  I saw that some of you have bought up the stock available on Pumpkinvine Corner.  But don’t worry, more has been ordered according to the website.

Meanwhile, you may also order the collection HERE and HERE.

My Subtle Strings colors are specially selected to achieve a subtle contrast effect in the quilting.  That is to say, we get to quilt with pretty colors on our quilts, but the colors aren’t really visible from afar and are not competing with the overall look of the quilt, until one looks at the quilting close up.  These colors are also perfect for piecing, machine or hand applique — definitely my go-to!  Why limit yourself to using only beige and light brown, or white?!

subtle1-1

subtle2

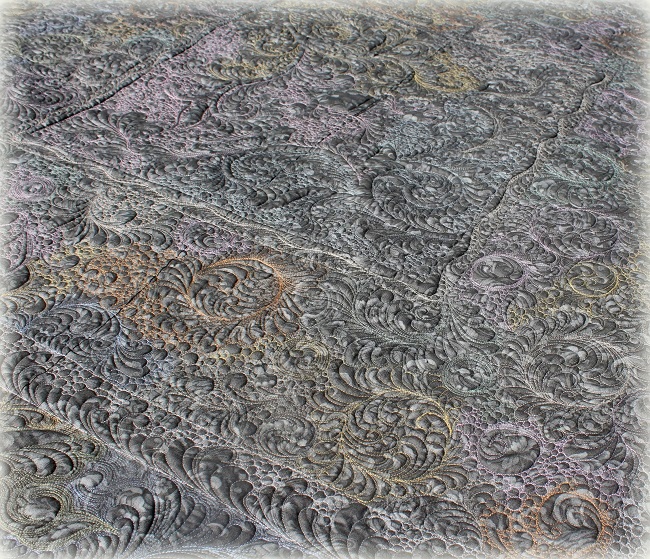
BEFORE WE START, here are the Subtle Strings colors I used for the different sections!  It’s a great time to experiment with subtle colors in quilting!  I hope you like subtle contrast quilting as much as I have!  Where the spool is indicates the area quilted with the color.

FOR TODAY’S INSTALLMENT:

#1,  If you have a needle down function on your machine, USE IT!  That way, when you have to turn your quilt, your needle won’t lose its spot if you have to turn your quilt.

#2.  It’s also time to shelf the walking foot for a little bit!  For the rest of the quilting, I foresee myself only using my free-motion quilting foot.  The far left foot attachment is the one I use, in fact, the ONLY one.

I like to use the open-toe foot because I can see better, and therefore decide where to go from one spot to the next when I am quilting.

#3.  I started off doing outline stitching and some on the sheep — just to warm-up a little.  Here I am showing you a few options.  References from my book: pages 30, 35, 50.

Outline quilting around the fluff – and continue with the echo inside the sheep.

Outline quilting around the fluff and tuft above the head.

Outline quilting in oval shape around sheep.

Outline quilting with swirls in the body.

Outline quilting, and then echo closely a few times around the body.

Outline quilting, and a few pebbles in the body to give a bit of texture.

And you know how quilting adds personality to one’s quilt, I added a bit of a personality to one of the sheep.  CLEARLY, he forgot what his mother has told him NOT to chew with his mouth open!!!

#4.  I then worked on the sky.  I outline quilted and then echoed around the clouds several times.  

Then, I quilted swirls with long tail (like a bean sprout almost).  This is a variation stemmed from the basic swirl in page 35 in my book.

#5.  Next I divided the grass into sections.

Section 1.  I quilted pebbles (page 50) and sand dunes (page 33) in this section.  I love the sand dunes because it’s like echoing without having to worry about the equal distance between the echoes.  It is much more freeing and forgiving.

Section 2.  More sand dunes in this one, except I added pebbles in between the pebbles.  And that’s another reason I like sand dunes because you can add bits and bobs in between the echoes.

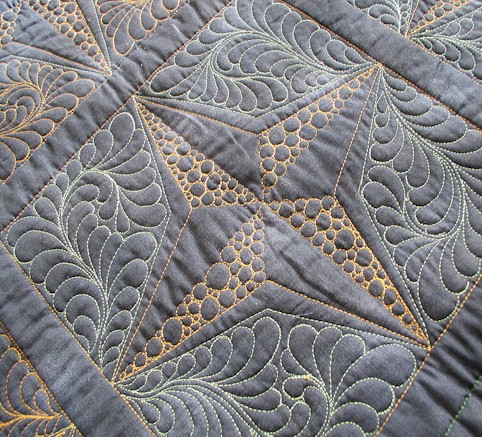
Section 3.  This section is quilted with horizontal and vertical lines (not necessarily straight) that make a wavy cross hatch (page 72).  I then go back and fill in alternate boxes with closely quilted lines to make a basketweave effect.  Spot the pink quilting? You can also see the occasional grass sprouting on a couple of the empty squares.  Feel free to add any accents to your liking!

Section 4.  I have to admit, I couldn’t help myself with the feather quilting!  I quilted the foreground of the panel center with feathers.  Once you are comfortable doodling feathers (pages 54-59), you could mark your feathers on the quilt itself and quilt by following the line…. OR you may mark the spines of the feather plume as a guide on your quilt, and free-hand quilt your feathers (page 79).

I was so proud of my students in my De-mystifying Feather Quilting Class last week at Road to CA, who were able to free-hand quilt their feathers, having NO prior feather quilting experience, and AFTER learning the basics of feather quilting well.

AND THERE YOU HAVE IT, for today’s installment!  You noticed how the colors I used in the quilting don’t jump out at you?  That’s the beauty of subtle contrast in quilting!

It might look like it is a lot to quilt the panel center, but wait, you actually get to quilt the panel center over the next three weeks!  I will still check in the next two Mondays.  The next installment isn’t till Feb 25.

I timed myself.  The panel center took me about 4 1/2″ hours of solid quilting.  But it’s all good fun.

However, if all this is overwhelming to you. Tackle one section at a time.  Even if you have to mark on your quilt before you quilt with a washable fabric marker, it is ALRIGHT!  I use either a Frixion Pen or this blue marker.

***

Remember, BABY STEPS!

NOW, I wonder what Karen has done …. remember, it’s ALL a mystery between the two of us!!!  I am heading on to her blog to see what she has been up to.  Click HERE to go to Karen’s blog.

See you next week!

Thread Talk From My Sewing Machine #70

thread-talk1

Happy Friday, Friends!  I feel like this week has gone by so quickly.  I promised you I would share with you a secret or two about my way of machine quilting earlier this week based on my recently completed Thread Journey quilt. Click here if you would like to see more pictures of the quilted finished product.

morning-pictures3

So, you know how sometimes chefs keep things simple by using simple ingredients in their cooking, but they learn to use those ingredients well?  My quilting philosophy is kind of like that too.  I generally do not use more than three quilting elements within a section when I quilt.  Hopefully you will see what I mean by the pictures I am showing you…

In the quilt center – feathers + pebbles for background (2 elements):

Aug11e

Aug11m

… and very occasionally, a bean sprout or two (so 2 1/2 elements) – you can see the bean sprouts sticking out amongst the pebbles in the top portion of the picture below.

Aug11h

Next, we have feathers + pebbles + sprouts in the Ohio Star inner border (3 elements):

August18g

August18i

Gray Sashing: feathers + pebbles (2 elements):

morning-pictures5

sept15d

Outer border: feathers (with occasional variations of sprout or pebbled spines) + echoing (2 elements):

sept15e

sept15h

sept15j

I keep my motifs simple and few in dense quilting because:

#1.  It is easier for the viewers to concentrate on certain elements of the quilting, then a whole bunch of motifs.

#2.  It affords me the opportunity to keep quilting the same thing, and thus able to work in the practice I need to master different motifs.  I don’t ever do practice pieces – because I always practice better on the real deal.

#3.  When a large expanse of quilting area is limited to 2-3 motifs, that also allows me to slip in trying out new ideas without being too noticeable.  That way, I can decide whether I like those new motifs or not. :)  There are quite a few moments of trying out new things in Thread Journey that I can’t even tell existed because how the major motifs I have selected have dominated the quilting area.

So basically,  I have quilted the entire Thread Journey quilt with feathers, echoing and pebbles, and nothing else that’s fancy. :)  See what I mean? Keep it simple, and use the simple to your advantage!!

I hope my sharing has helped you… it’s not just using the simple motifs, but rather it is a matter of using the simple well.

Have a great weekend – till next time!

Thread Journey: Done!!!

banner1

Friends, my Aurifil Thread Journey quilt is finished!!!!  I shall again let the pictures do most of the talking today. First we had the un-quilted, but constructed many week ago…

July13i

After about 52 hours of just quilting alone at the machine, we have the finished product!

morning-pictures1

morning-pictures2

morning-pictures3

morning-pictures5

sept15b

sept15c

I quilted the entire quilt with colors from my Aurifil’s Subtle Strings collection.  You may read more about the collection here, and exactly why those shades are chosen.  You may also order the thread collection from heresubtle1-1

subtle2

And you will see how the Subtle Strings colors meet in the following close-up pictures.

sept15d

sept15e

sept15g

sept15h

sept15i

sept15j

sept15k

And here is a quick look at what the back looks like.

sept15n

That’s it for my Thread Journey 2.0!  It’s been such a fun journey for me being able to quilt to my little heart’s content on this one.  You may find the instructions on how to construct the quilt, as well as quilting suggestions here.

Come back tomorrow for the announcement of the giveaway winner of Windham’s Maribel FQ bundle.  Have a lovely rest of your week!

Creative New Quilts & Projects Project Highlight #1: Counting My Blessings

CreativeNewQuilts&Projects

Hello Friends, we are in Thanksgiving mode at my end.  We have a certain little girl who is super-excited about Thanksgiving!  And I thought it would be apt for me to share with you my banner quilt project Counting My Blessings.

birdhouse

Counting My Blessings is a precuts/stash friendly project in that the pieced background of the banner is made of 2 1/2″ precut batiks strips.  So, you have any of the leftover jellyroll strips laying around…. just sayin’!  The applique(machine fusible) of the pagoda birdhouse is done with charm squares, and so are the yoyo’s.

IMG_1957

IMG_1949

The yoyos were first made, and then blind-stitched onto the banner after the quilt was quilted.

IMG_9591

This entire banner is constructed and quilted with Aurifil Mako 50 Cotton threads.  The quilting is done with subtle contrasting effect by using threads that give just a smidgen-y hint of contrast to compliment the background fabrics.  I used light pink, light blue, lavender threads to quilt the different portions of the banner.

IMG_1955

IMG_9590

IMG_1951

And of course, my idea of subtle contrasting quilting effect has recently been packaged in Subtle Strings thread box by Aurifil.

WS DRAFT2

IMG_1775

I used a combination of silk and wool batting from Hobbs Tuscany collection — you can see that my feathers really have the “poof” factor going on from that batting combination!

IMG_9586

Complete pattern instructions including full sized templates are found in my book Creative New Quilts & Projects from Precuts or Stash.  This banner project also comes with an autumn version.  Leaf template is also in the book.

IMG_1972

IMG_1962

I hope you have a great Thanksgiving week, Dear Friends!  Please know that when I count my blessings, you are definitely one of them!!!  I shall catch up with you later!

Post Houston Fall Market #1

I have decided this is going to be my new hair color, now that I have been to Market and back…

IMG_1831

Well, no, not really…. this is one of the skeins of threads from Aurifil’s thread “waterfall” display at their booth this year.  It was AMAZING!  Many of you have probably seen pictures of the display on various sites.

IMG_1827

IMG_1927

IMG_1928

And here is a picture of my Birds, Stars & Swirls quilt (officially called Thread Journey) displayed at Aurifil’s booth this year.  Having a quilt displayed at Aurifil’s booth is definitely one of my Market highlights this year.

IMG_1923

My quilt draped on one of Aurifil’s crates during set-up day.

IMG_1838

IMG_1840

This entire quilt is constructed with threads from Aurifil‘s Subtle Strings collection — consisting of my favorite colors to use for subtle contrasting quilting.  I included in the thread box my go-to color 2310, which I had used for piecing this quilt.  I used the other colors to quilt at various spots on the quilt.

IMG_1775

IMG_1776

You can see better in this following picture what I mean about the different colors being used to quilt the quilt.

IMG_1835

I had shared a couple of pre-yoyo sneak peeks last week:

IMG_1803

IMG_1806

The following picture is post-yoyo.

IMG_1852

Sometimes, subtlety goes a long way.  You can see the subtle contrast better on the back of the quilt.  Thank you to Windham Fabrics for providing the fabric for my backing fabric.  I used a slate-ish gray from their Palette collection (37098-3).

IMG_1843

IMG_1844

I showed this very quilt at one of my Schoolhouse sessions.  THANK YOU to all of those who took the time later to tell me you liked my quilt.  It meant heaps to me!  [For those who are new — I free-motion quilted the quilt with my Bernina home machine.]

I wasn’t able to take very many good pictures of this quilt.  For the record, the last yoyo was officially attached onto the quilt at 9:30am on the day of Schoolhouse.  After that, I was rushing to get ready to get on with my day.  The quilt is supposed to come back to me for a short little while for me to take better pictures before it heads of to an exciting adventure!  More about that later.

I will have more snippets to share this and next week, in addition to catching up with other posts that have been scheduled.  For now, I have to unpack, and re-pack myself again for my next trip to Annie’s Craft Festival this Thursday.  Later, Dear Friends!

Parade: Preview

Hello Friends,  earlier this week I showed you the Chambray Rose fabrics with which I have been playing…

IMG_1296

The quilt is now completed and shipped, and here are a few sneaky peeks for you…

IMG_1321

IMG_1326

IMG_1327

Now, I have to catch up on other things…. like laundry, housework etc.  Thus are glimpses of my very unglamorous life. :) Thank you for stopping by – I hope you have a lovely rest of your day.

Thread Talk from My Sewing Machine #64

thread-talk1

Happy Monday, Friends!  I hope you all had a wonderful weekend.  I had to pack in quite a bit of work to make something happen, but that’s okay.   I am just now catching up with your comments/emails!

Often times what I plan in my mind for quilting scheme on my quilts don’t come to pass.  On this most recently finished quilt, I had planned for formal feather plumes — but one just can’t quite force formal on adorable polka dots.

IMG_0735

In the end, I turned to my informal pseudo feathers and “plume-ified” them.  Basically, I quilted my plumes as I would in my regular feather plumes, except forming my feather lobes differently.  It took a little bit to get used to. Just make sure you follow the path of quilting the regular feather plumes, and go from there, and I think you will be fine.  The effect is lighter, air-ier, and sweeter!

Click here to read about my Thread Talk post on feather plumes.

Click here to read about forming psedo-feathers.

Click here to read all of my archived Thread Talk post.

Thank you for stopping by – I have to run for now.  I have A LOT to get done before I can go to bed tonight.  I shall catch up with you later!  Love and hugs to you all.

Light and Quilting!

Hello Friends, I hope you are well.  My Calico Trail quilt (read about the quilt here) tagged along when I took a few other quilts for a photo shoot session recently.  I shall let the pictures do the most of the talking… about how the 7am sunlight reflected the quilting on Calico Trail.

IMG_0374

IMG_0355

IMG_0360

IMG_0362

IMG_0366

IMG_0400

The entire quilt is constructed and quilted with Aurifil Mako 50 cotton thread.  Batting used is Hobbs Tuscany Silk batt.  Fabrics are from Quilting Treasures‘s Petals and Matrix collections.

Light is amazing, is it not?

Thanks for stopping by, Dear Friends.  It’s been a happening week, and I am trying to keep my head above the water! Tootles for now.

Spring Stitching: Sneak Peek

Hello Friends, it’s been a super busy week.  I have been doing some spring stitching… with Aurifil‘s 2423 sweet and pink thread.   I actually should be doing some spring cleaning, but… I don’t want to think or talk about that just yet! :)

IMG_9680

And because it is spring, I quilted some springy flowers on a recently finished project.  Come back for a Thread Talk tutorial tomorrow on how to quilt this sweet “Riley Blake-ish” flower!  If you like Riley Blake’s fabrics, you will know what I mean!

IMG_9687

I need to get back to work.  Do tell me how your Holy Week is shaping up, and I do hope you have a most blessed rest of the week!  Hugs to you all.

2015 National Quilting Day & Giveaway!

Hello Friends — Happy Saturday and Happy National Quilting Day!  Read about National Quilting Day here.

IMG_8354

Once upon a time, there was girl who lived in the tropics, in the comfort of home, church, and many relatives.  All her life, she dreamed upon going to England for college… ever since she was five years of age.

starry pursuit6

IMG_4264

She worked hard at school… because of the consuming dream of going to England for college.

IMG_4671

IMG_7166

IMG_6998

The day came, she left home to go to college…. not to England, but to the United States.  She was disappointed at the time, but she accepted that it was the path chosen for her.

IMG_2343

IMG_4424

She finished college with a graduate degree.  She married.  She had a little girl.

Autumn Stars2

Somewhere in her years in the US, she met a most generous and loving lady — who taught this girl how to quilt.

QATB2c

IMG_0134

And the rest is history.  Because someone else stepped in, and encouraged, and took the time to teach this girl (who hadn’t really even touched a sewing machine in her life), this girl’s life was changed!

IMG_1969

coxcomb32

IMG_2940

She made many sweet quilting and non-quilting friends along her quilting journey.  She was able to do things not dreamed off in all her dreams of going to England for college…

IMG_3193

IMG_9333

And she continues to accepts the path chosen for her, by her loving God.

IMG_9213

IMG_8122

IMG_9539And in a roundabout way, though she sees that she is but a whiff of air passing through this world, she is inspired by the people she meets to make a difference in her small roundabout circle…because someone else had made a difference in her life.

IMG_5529

On this National Quilting Day, this is a roundabout way of telling the story of an Asian girl who discovered the joy of quilting, because a loving lady who answered the call to make a difference in the lives of others!  Thank you, Barbara!

And Happy National Quilting Day again, Everyone!!

***

Annie’s has generously sponsored a giveaway of my online class Learn to Machine Quilt class.  Leave a comment between now and March 27, 2015 to enter giveaway.  Winner will be announce on March 30, 2015.

IMG_7784

learn to machine quilt

Speaking of machine quilting, stay tuned for some exciting news!

Migration in American Patchwork & Quilting Calendar 2015

387_1_

Happy Friday, Friends!  I hope you have had a good week.  I have been wanting to share with you a couple of quilts before the year ends.  The first quilt is Migration, and it is featured in American Patchwork & Quilting’s 2015 calendar.

102151485

 image source: Meredith Corporation

Migration is a little different from my usual style.  It is a geometry-centric design that focuses on the use of flying geese units in different color gradients to achieve a captivating (I hope) visual effect.  I had the GREATEST fun making the quilt, and I felt I was rather hip after completing the project.

IMG_8376

IMG_8364

Migration uses fabrics from Island Batik — check out Island Batik’s website here for similar fabric swatches that can be used to replicate the quilt.  Actually I would really love to hear what other color combinations you have in mind!  I am thinking a fiery yellow and orange and red combination would make a very stunning visual impact.

IMG_8381

The quilt design lends itself to much negative space for quilting.  The following picture partially shows the back where I had quilted circles randomly across the quilt, and then filled in with feathers.

IMG_8361

Here are a few close up pictures of the quilting on the quilt front.  I know I sound like a broken record, but I honestly don’t think I will enjoy the quilting process as much as I do if it weren’t for the Aurifil Mako 50 Cotton threads I am using.

IMG_8354

I included the following shot to show just how tiny and tight Aurifil’s Mako 50 Cotton thread allows me to quilt in the background fillers in the picture above.

IMG_8355

I wanted my quilt to lay flat and not stiff as cardboard after all the dense quilting.  So I opted to use Hobbs Tuscany Silk batting as the “meat” of my quilt.  I also made a hanging sleeve for this quilt because I know for sure I want to hang this quilt up somewhere.

IMG_8348

IMG_8377

Want to make Migration?  American Patchwork & Quilting Calendar comes with a separate booklet with complete instructions for all 12 projects.  You may purchase the calendar here. The calendar and booklet would be great for anyone who wants to do a QOM (Quilt of the Month) regimen.

IMG_8384

I actually have two projects featured in the calendar.  I will be sharing about the other project next week.  So do come back! :)  It is that star quilt on the top right corner — and you know what I think of star quilts!

387_2_

Tell me what you think of Migration.  And this rounds out a very intense week for me!  I intend to work still, but will take things a bit more slowly.  Have a blessed weekend, Dear Friends!

***

My 2014 lineup to date — click on project names for more information on individual projects.

Editorial features:

American Patchwork & Quilting (Calendar 2015): Get Happy

American Patchwork & Quilting (Calendar 2015): Migration

Annie’s Row Quilt Book (March 2014): Stardom

Annie’s Dazzling Diamond Quilts Book (May 2014): Solar Star

Australian Quilters Companion (Issue 68): Stars Aligned

Australian Quilters Companion (Issue 70): Pocketful of Daisies Welcome Banner

Fons & Porter Table Toppers Book (September 2014): Silver Maple

Fons & Porter’s Easy Quilts (Summer 2014): Teething Rings

Fons & Porter’s Love of Quilting (January/February 2014): Hurry Home

Fons & Porter’s Easy Quilts (Winter 2014): Hoppity Hop

Generation Q (May/June 2014): Hole in the Wall

McCall’s Quick Quilts (August/September 2014): Owl Be Your Friend

McCall’s Quilting (January/February 2014): Spiral Squared

McCall’s Quilting (July/August 2014): Bird Watching

Popular Patchwork, UK (April 2014): Mending Fences

Popular Patchwork, UK (September 2014): A Mother’s Love

Popular Patchwork, UK (December 2014): Christmas Wreath Runner

Popular Patchwork, UK (December 2014): Yuletide Snowflakes

Quilt Trends (Winter 2014): Enchanted Forest

Quilt Trends (Winter 2014): Urban Stars

Quilter’s World (Spring 2014): Urban Oasis

Quilter’s World (Summer 2014): Starry Repetitions

Landauer Publishing’s Recreating Antique Quilts (October 2014)

The Quilter (December 2013/January 2014): Farm Crossing

The Quilter (December 2013/January 2014): Boxing Day

The Quilter (April/May 2014): All Squared Up

The Quilter (April/May 2014): Tulip Trail

The Quilter (June/July 2014): Garden View

The Quilter (August/September 2014): Song of Praise

Free to use designs / PDF download:

January: Midori’s Place using Gramercy by Benartex

January: View on Lexington using Gramercy by Benartex

January: Everything’s Coming Up Rosey using English Rosey by Benartex

February: Verde (Quilt) by Quilting Treasures

February: Verde (Banner/Runner) by Quilting Treasures

March: Hot Topic by Quilting Treasures

March: Poseidon’s Adventure using Neptune’s Dream by Benartex

March: My Cozy Sweater using Palm Springs by Benartex

March: Wild Kingdom using Sew Rousseau by Benartex

April: Fun with Frosty (Quilt & Runner) by Quilting Treasures

April: The First Thanksgiving (Quilt & Runner & Placemat) by Quilting Treasures

May: Party Poppers using Paintbox/Shadows by Benartex

May: Sprinkled Sweets using Paintbox/Shadows by Benartex

May: Dino Craze using 10,000 B.C. by Benartex

June: Monster Mash by Quilting Treasures

June: Santa’s Sleigh using Starry Night by RJR Fabrics

June: Learning is Fun by Quilting Treasures

August: Lovey Buggy using Luv Bugs by Benartex

August: Hot Little Dish (Wallhanging/Table Topper & Runner & Placemat) by Quilting Treasures

August: Sweet Hearts using Luv Bugs by Benartex

August: Pagoda Paradise using Little Harajuku by Benartex

October: At the Pond using Leap Frog by Benartex

October: Expressions of Faith (Sofa Quilt) by Quilting Treasures

October: Expressions of Faith (Tablerunner) by Quilting Treasures

October: Expressions of Faith (Infant Quilts) by Quilting Treasures

November: Sunshine using Sunny Days/Sunny Bonnet Susie by Benartex

November: Sew Lovely using Made With Love by Benartex

Thread Talk from My Sewing Machine #57

thread-talk1

Hello Friends, I hope you are well.  I am happy to share a little more about my “Roundabout Feathers”, as dear friend Joyce calls them.  Joyce gave me her permission to coin the name “Roundabout Feathers” for these fun feather wreaths with a twist!  These feathers are free-hand quilted with very minimal marking, as shown later.

IMG_5529

[Sorry about that little piece of lint in this following picture!]

IMG_5533

IMG_5532

SO — you have this open space that is perfect for quilting something feathery!  For this particular quilt, I have A LOT of open space that I needed something feathery…. but I wanted to add visual interest to the feather wreaths, and not have all of them look identical… so I thought off-centered and concentric wreaths would do the job.

First, I looked through my piles of dishes, and found two bowls – one large, and one smaller.  You can decide what sizes work for you – just make sure one is smaller than the other.  And I then trace the circles on the open space.  The circles then form the spines of the wreaths, and are the determining factor of the placement of your wreath.

IMG_5558

The key is to remember the inside feathers of the inner ring MIRRORS the outside feathers of the outer ring, as shown.  You can definitely mark the orientations of the first feather on each ring before you start if the feather wreaths on your quilt are direction-specific.

IMG_5559

Then, you would start filling the outside of the outer ring, and inside of the inner ring with feathers!

IMG_5561

Then, it’s time to feather the inner feathers of the outer ring.

IMG_5563

For the outer feathers of the inner ring, I don’t do “full” feather lobes on some of them just to give the eye a bit of rest — instead I quilt the effect of overlapping feathers, as shown in the schematic.

IMG_5564

I find these roundabout feather wreaths to be very versatile.  I can place them wherever I want on an open space, and I can decide how large or small my rings would be, and thus further customizing their appearances.  I hope you can see what I mean with the pictures of the wreaths quilted in real life that I had shared with you earlier in this post.

I hope you will give these wreaths a try!  Curious mind would love to know what you think of them! :)

IMG_5516

Thanks for stopping by.  I hope you have a lovely week!

***

Click here, here, and here to read my other Thread Talk posts on quilting feather wreaths.