Joint Venture with Karen Miller: Mystery Quilt Along – Part 7

Jan 7: Announcement post
Jan 21:  Planning, basting, batting, etc
Jan 28:  Stabilization quilting or just to catch up
Feb 4, Feb 11: Inside center panel
Feb 25: Top and Bottom Rectangles
***March 4: Top and Bottom Squares
March 11: Left and Right Side panels
Mach 18: Narrow Sashing
April 1: Outside (wider) Border
April 8: Binding & Hanging

***

It’s Monday, and Happy Monday, Friends!  You know what Monday means >>> we are back at it with our very mysterious machine quilting quilt-along.  I hope you have enjoyed it as much as Karen and I have hosting it.  Karen and I were oohing and aahing over your progress pictures!  Keep connecting with us so that we can celebrate your success and progress!

***

In the event of you might still be gathering your supplies, don’t worry! That’s okay — jump in when you are able to. Click HERE where Karen keeps a list of shops where you can purchase the supplies.

2019c

I have heard positive responses from many regarding my book.  THANK YOU!

You may order my book from:

Connecting Threads

Fox Chapel Publishing

Amazon

or email me for signed copies!

I will be using Aurifli 50 wt threads from my Subtle Strings collection.  You may read more about the collection here, and here.  You may order your collection here for $99.99 (regularly selling for $140)!  The collection is IN STOCK again as of this morning!!!

Meanwhile, you may also order the collection HERE and HERE.

My Subtle Strings colors are specially selected to achieve a subtle contrast effect in the quilting.  That is to say, we get to quilt with pretty colors on our quilts, but the colors aren’t really visible from afar and are not competing with the overall look of the quilt, until one looks at the quilting close up.  These colors are also perfect for piecing, machine or hand applique — definitely my go-to!  Why limit yourself to using only beige and light brown, or white?!  LIFE’S TOO SHORT!

subtle1-1

subtle2

Today’s installment is actually a continuation of what we did last week — the quilting motif I used to quilt the top and bottom rectangles just sort of “spilled” over to the side squares, with using a plate for a marking tool (!).  In case you need to reference the book in addition to the post from last week (click HERE), the pages are: page 17, 50-51, 60-63 and 66.  

So we left off with these last week:

Even though it’s a continuation in quilting motifs, I do want to use today’s post to illustrate an important concept.  Machine quilting does NOT only just add texture to a quilt.  You can also use machine quilting to CREATE THE ILLUSION OF A BLOCK, BETTER YET A BLOCK YOU PROBABLY WOULDN’T NORMALLY PIECE!

Let me explain — so, I “converted” the side squares into drunkard path blocks!  Curve-piecing isn’t quite my forte although I just completed a quilt that has nothing but curve piecing.  But the point is it was really nice I could use machine quilting to create the illusion of curve piecing in the side squares.  HOW COOL IS THAT?

Pretty much for side squares, I outline-quilted the sheep, and continued with the motif used in the top and bottom rectangles.

Top left

Top right

Bottom left

Bottom right

There you have it — if you don’t like to physically piece a certain quilt block, the next option is to see if you could “machine quilt” it into existence! :)


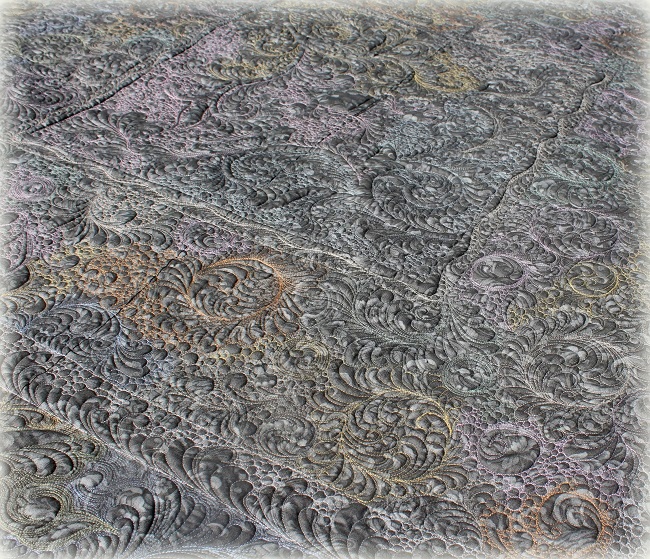
Oh, I forgot — I used the pink from my Subtle Strings collection to quilt the side squares.  Notice how the pink on a spool looks strong, but with one strand of thread on the quilt, the pink is just slight, and when quilted on the green, one can hardly tell it is pink.  Subtlety does go along way, doesn’t it?

Alrightie, Friends — I hope you continue to have fun in this mystery quilt along.  Now, let’s go what Karen has to share with us.  I know it will be something good…  Click HERE to go to Karen’s blog.  Happy Quilting!  See you next time!


Joint Venture with Karen Miller: Mystery Quilt Along – Part 4

Jan 7: Announcement post
Jan 21:  Planning, basting, batting, etc
Jan 28:  Stabilization quilting or just to catch up
***Feb 4, Feb 11: Inside center panel
Feb 25: Top and Bottom Rectangles
March 4: Top and Bottom Squares
March 11: Left and Right Side panels
Mach 18: Narrow Sashing
March 25: Outside (wider) Border
April 1: Binding & Hanging

***

Hello Friends, here we are again on our Quilt-Along Monday!  There’s not a new installment because Karen and I know the hustles and bustles of life all too well, and sometimes we just can’t get to quilting like we would like.  The panel center is a relatively large area, so, we though we would give folks a couple week to get that done before we move on to the subsequent sections.  If you missed my post last week on quilting the panel center, here is the link again!

Now, some of you might still be gathering your supplies.  That’s okay — jump in when you are able to. Click HERE where Karen keeps a list of shops where you can purchase the supplies.

2019c

I have heard positive responses from many regarding my book.  THANK YOU!

You may order my book from:

Connecting Threads

Fox Chapel Publishing

Amazon

or email me for signed copies!

I will be using Aurifli 50 wt threads from my Subtle Strings collection.  You may read more about the collection here, and here.  You may order your collection here for $99.99 (regularly selling for $140)!  The collection is IN STOCK again as of this morning!!!

Meanwhile, you may also order the collection HERE and HERE.

My Subtle Strings colors are specially selected to achieve a subtle contrast effect in the quilting.  That is to say, we get to quilt with pretty colors on our quilts, but the colors aren’t really visible from afar and are not competing with the overall look of the quilt, until one looks at the quilting close up.  These colors are also perfect for piecing, machine or hand applique — definitely my go-to!  Why limit yourself to using only beige and light brown, or white?!

subtle1-1

subtle2

So far, here are the Subtle Strings colors I used for the different sections!  It’s a great time to experiment with subtle colors in quilting!  I hope you like subtle contrast quilting as much as I have!  Where the spool is indicates the area quilted with the color.

Since we are on a downtime installment-wise, I thought I would chat with you briefly on quilting results and personality!  One observation that has been consistent from all the free-motion domestic machine quilting classes I have taught is that different quilters will quilt differently the one motif that is being presented.  For example, we would be working on pebbles (pages 50-51), and students will end up with different shapes or sizes for their pebbles.

I always remind my students how our quilting looks is like how our signature looks!  And that solves the mystery why we often end up with different looks when we quilt one motif.  And you know what, THAT is perfectly fine!  Your quilting reflects and celebrates you!!!

Of course, quilting adds personality to a quilt.  If a quilt is quilted with puppies and bone treats, you know that it is a lighthearted quilt, versus a quilt quilted with 1/4″ cross hatches and feather plumes.  I encourage you to find ways to add personalities to the panel as you quilt it.  I quilted “grass” to the face of one of the sheep — to give him (I think of it’s a him!) a  mischievous personality.  Doesn’t he look like he KNEW BETTER than to chew with this mouth open?!

So, let’s try to analyze my personality from how I have quilted the panel center.

#1.  I tend to be OCD on things — especially when it comes to feather quilting.  I see anything and everything as excuses to quilt feathers.

#2.  I can at times major on the minor — from the way I like to keep my quilting dense.

#3.  I like movement with the curves and swirls — I like things to be non-static.

Anything you can deduce about my personality from the quilting?  NOSY and VERY CURIOUS mind would like to know! :)

I hope you are having the time of your life working on this piece.  I know I have!  See you again next Monday, but not before you check out Karen’s post for today!  Click HERE to go to Karen’s blog.

Joint Venture with Karen Miller: Mystery Quilt Along – Part 3


Jan 7: Announcement post
Jan 21:  Planning, basting, batting, etc
Jan 28:  Stabilization quilting or just to catch up
***Feb 4, Feb 11: Inside center panel
Feb 25: Top and Bottom Rectangles
March 4: Top and Bottom Squares
March 11: Left and Right Side panels
Mach 18: Narrow Sashing
March 25: Outside (wider) Border
April 1: Binding & Hanging

***

Hello Friends, Happy Monday!  I hope your week got off a great start, and that those of you who lived in last week’s extreme cold have thawed out nicely, and are ready to do some quilting on your machine.

Now, some of you might still be gathering your supplies.  That’s okay — jump in when you are able to. Click HERE where Karen keeps a list of shops where you can purchase the supplies.

2019c

I have heard positive responses from many regarding my book.  THANK YOU!

You may order my book from:

Connecting Threads

Fox Chapel Publishing

Amazon

or email me for signed copies!

I will be using Aurifli 50 wt threads from my Subtle Strings collection.  You may read more about the collection here, and here.  You may order your collection here for $99.99 (regularly selling for $140)!  I saw that some of you have bought up the stock available on Pumpkinvine Corner.  But don’t worry, more has been ordered according to the website.

Meanwhile, you may also order the collection HERE and HERE.

My Subtle Strings colors are specially selected to achieve a subtle contrast effect in the quilting.  That is to say, we get to quilt with pretty colors on our quilts, but the colors aren’t really visible from afar and are not competing with the overall look of the quilt, until one looks at the quilting close up.  These colors are also perfect for piecing, machine or hand applique — definitely my go-to!  Why limit yourself to using only beige and light brown, or white?!

subtle1-1

subtle2

BEFORE WE START, here are the Subtle Strings colors I used for the different sections!  It’s a great time to experiment with subtle colors in quilting!  I hope you like subtle contrast quilting as much as I have!  Where the spool is indicates the area quilted with the color.

FOR TODAY’S INSTALLMENT:

#1,  If you have a needle down function on your machine, USE IT!  That way, when you have to turn your quilt, your needle won’t lose its spot if you have to turn your quilt.

#2.  It’s also time to shelf the walking foot for a little bit!  For the rest of the quilting, I foresee myself only using my free-motion quilting foot.  The far left foot attachment is the one I use, in fact, the ONLY one.

I like to use the open-toe foot because I can see better, and therefore decide where to go from one spot to the next when I am quilting.

#3.  I started off doing outline stitching and some on the sheep — just to warm-up a little.  Here I am showing you a few options.  References from my book: pages 30, 35, 50.

Outline quilting around the fluff – and continue with the echo inside the sheep.

Outline quilting around the fluff and tuft above the head.

Outline quilting in oval shape around sheep.

Outline quilting with swirls in the body.

Outline quilting, and then echo closely a few times around the body.

Outline quilting, and a few pebbles in the body to give a bit of texture.

And you know how quilting adds personality to one’s quilt, I added a bit of a personality to one of the sheep.  CLEARLY, he forgot what his mother has told him NOT to chew with his mouth open!!!

#4.  I then worked on the sky.  I outline quilted and then echoed around the clouds several times.  

Then, I quilted swirls with long tail (like a bean sprout almost).  This is a variation stemmed from the basic swirl in page 35 in my book.

#5.  Next I divided the grass into sections.

Section 1.  I quilted pebbles (page 50) and sand dunes (page 33) in this section.  I love the sand dunes because it’s like echoing without having to worry about the equal distance between the echoes.  It is much more freeing and forgiving.

Section 2.  More sand dunes in this one, except I added pebbles in between the pebbles.  And that’s another reason I like sand dunes because you can add bits and bobs in between the echoes.

Section 3.  This section is quilted with horizontal and vertical lines (not necessarily straight) that make a wavy cross hatch (page 72).  I then go back and fill in alternate boxes with closely quilted lines to make a basketweave effect.  Spot the pink quilting? You can also see the occasional grass sprouting on a couple of the empty squares.  Feel free to add any accents to your liking!

Section 4.  I have to admit, I couldn’t help myself with the feather quilting!  I quilted the foreground of the panel center with feathers.  Once you are comfortable doodling feathers (pages 54-59), you could mark your feathers on the quilt itself and quilt by following the line…. OR you may mark the spines of the feather plume as a guide on your quilt, and free-hand quilt your feathers (page 79).

I was so proud of my students in my De-mystifying Feather Quilting Class last week at Road to CA, who were able to free-hand quilt their feathers, having NO prior feather quilting experience, and AFTER learning the basics of feather quilting well.

AND THERE YOU HAVE IT, for today’s installment!  You noticed how the colors I used in the quilting don’t jump out at you?  That’s the beauty of subtle contrast in quilting!

It might look like it is a lot to quilt the panel center, but wait, you actually get to quilt the panel center over the next three weeks!  I will still check in the next two Mondays.  The next installment isn’t till Feb 25.

I timed myself.  The panel center took me about 4 1/2″ hours of solid quilting.  But it’s all good fun.

However, if all this is overwhelming to you. Tackle one section at a time.  Even if you have to mark on your quilt before you quilt with a washable fabric marker, it is ALRIGHT!  I use either a Frixion Pen or this blue marker.

***

Remember, BABY STEPS!

NOW, I wonder what Karen has done …. remember, it’s ALL a mystery between the two of us!!!  I am heading on to her blog to see what she has been up to.  Click HERE to go to Karen’s blog.

See you next week!

Joint Venture with Karen Miller: Mystery Quilt Along – Part 2

Jan 7: Announcement post
Jan 21:  Planning, basting, batting, etc
***Jan 28:  Stabilization quilting or just to catch up
Feb 4, Feb 11: Inside center panel
Feb 25: Top and Bottom Rectangles
March 4: Top and Bottom Squares
March 11: Left and Right Side panels
Mach 18: Narrow Sashing
March 25: Outside (wider) Border
April 1: Binding & Hanging

***

Hello Friends, I just spent a better of last week at Road to CA show.  It was a fun show making new friends, and sharing the love of domestic machine and feather quilting with my new friends!

I even met some who already heard about our Mystery Quilt Along, and for those heard about it from me at the show, they were excited.  So, today is another minimally demanding day for those who already sandwiched their quilt.  Some might just now be getting their supplies in the mail.  All’s good — you just catch up whenever you are able.  If you are just now joining, click on the previous dates above for more information.

Now, I have heard that certain shops sold out of the panel, click HERE where Karen keeps a list of shops where you can purchase the supplies.

2019c

You may order my book from:

Connecting Threads

Fox Chapel Publishing

Amazon

or email me for signed copies!

I will be using Aurifli 50 wt threads from my Subtle Strings collection.  You may read more about the collection here, and here.  You may order your collection here for $99.99 (regularly selling for $140)!

subtle1-1

subtle2

FOR TODAY’S INSTALLMENT:

#1,  If you have a needle down function on your machine, USE IT!  That way, when you have to turn your quilt, your needle won’t lose its spot if you have to turn your quilt.

#2.  We are stitching straight lines.  So, you have the option of using your walking foot, or  your dual feed foot.  Both feet ensure all layers are moved at the same time!  Please note that your walking or dual feed foot might not look exactly as what I have.  If you have any doubt, please reach out to your local machine dealer for help.  I learn so much from my machine dealer.


Today, we are going to stabilize our quilt sandwich.  I try to stabilize, but not over-stabilize, my quilt sandwich by first stitching down the edge of the quilt.  I stitch very close to the edge of quilt top just to anchor my quilt top so I don’t have to deal with “loose leaves” so to speak with the quilt top, batting and quilt back.  It’s totally fine if you don’t catch all of the fabric edge.

If you have a needle down function on your machine, USE IT!  That way, when you have to turn your quilt, your needle won’t lose its spot if you have to turn your quilt.

One of my tips I share in my book Stitching Pathways is instead of using the quilting foot as a guide, watch your needle to see where it lands to ensure accurate stitching.  A student of mine told me in one of the classes I taught at Road to CA this past week, that tip was the game changer for her.  So, in order for you to practice that, we will stitching around the large center of the panel where the dotted boundary is.  Try to stitch slow, and keep your eye to the needle.

So the previous image also illustrate a very important point — if you see any basting pins that are too close to your needle ensemble, go ahead and remove the pin before you stitch.  That will keep the pin from catching the needle ensemble and produce poor quality stitches.  Generally, I leave my stitching area about 3″ around and all all sides my needle clear  of any obstacles (basting pins).  So in real, before I quilt any further, I would go ahead and remove that basting pin.

So there you have it, for today!  

qal13

Now a quick note on starting and stopping…. I like to pull up my bobbin thread before I start.  You can do that by rotating the hand wheel, and tugging on the top thread.  Once you have the bobbin thread up, you will have two thread tails on the quilt top.  I hold on to the tails, and take a few small stitches (if it’s with feed dog, I just reduce the stitch length) before I quilt normal.  To stop, I will reduce the stitch length of my stitches as well.  This time, I will only have the top thread on top.  So, after those mini stitches, I will have my needle up, pull my quilt sandwich out from the needle, and cut off enough top and bottom thread to have tails, and then, I bury all the tails into the quilt batting.

To get us ready for next week — when we get to the actual quilting part, WOOHOO — you might do some practice quilting on a practice piece using my Stitching Pathways book, specifically the motifs covered in pages 30, 32, 33, 50 and 52.  I think I am going to add a bit of feathering in there too.  Feathers are covered in pages 55-66.  

In today’s baby step, we stabilized our quilt for stress-free quilting on the machine later.

NOW, I wonder what Karen has done …. remember, it’s ALL a mystery between the two of us!!!  I am heading on to her blog to see what she has been up to.  Click HERE to go to Karen’s blog.

I CAN’T WAIT TO SHARE WITH YOU NEXT WEEK HOW I AM QUILTING THE PANEL CENTER NEXT WEEK — SEE YOU NEXT MONDAY!

WINNER of Annie’s Machine Quilting Class of Choice & DISCOUNT KEYCODE

Hello Friends, the winner of my Annie’s Machine Quilting Class of Choice Giveaway is: Gloria Cotten!  An email is sent to you to inform you someone at Annie’s will be in touch!

pathways1

flower

I really wish I could give each of you a free class, but that’s out of my hands. :(  Thank you to all of you for entering the giveaway.  You know where to find me should you have a free-motion-quilting question you have while you are attempting to quilt your own quilts.

MEANWHILE, ANNIE’S IS OFFERING A 20% DISCOUNT FOR MY BLOG FOLLOWER between now and November 14, 2016 – ENTER KEYCODE: SHEPQLT

I hope this offer will be advantageous to you!  Again, here are my 5 domestic machine quilting classes offered with Annie’s.

#1. Learn to Machine Quilt – click here for more information.

#2.  Machine Quilting Level 2 – click here for more information.

#3.  Learn to Machine Quilt Pieced Blocks – click here for more information.

#4.  Learn to Machine Quilt With Stencils & Templates – click here for more information.

#5.  Learn Modern Straight Line Machine Quilting – click here for more information.

And I will be back soon with details about my domestic machine quilting book, due out in March 2017!

***

Meanwhile, if you haven’t tried using Aurifil’s Mako 50 wt to machine quilt, I highly recommend it!!  It took me two or three stops at the Aurifil booth at Fall Market to “meet myself”. :)  They had a wall display with quilters’ thoughts on their threads.  I was surprised to find a quote from me!!!!

aurifil-booth

Saturday Salutation!

Hello Friends, I hope you have been well.  We are at the library doing homework, reading, and drawing for Miss Baby, and catching up with work and thoughts gathering for me.  Things are a bit crazy at the moment, but I thought I would send you a bit of quilty flowery goodness on this wet and chilly Saturday at my end.

flower

I shall catch up with you later!!!  Have a great rest of your weekend.  Hugs to you!

Thread Journey: Done!!!

banner1

Friends, my Aurifil Thread Journey quilt is finished!!!!  I shall again let the pictures do most of the talking today. First we had the un-quilted, but constructed many week ago…

July13i

After about 52 hours of just quilting alone at the machine, we have the finished product!

morning-pictures1

morning-pictures2

morning-pictures3

morning-pictures5

sept15b

sept15c

I quilted the entire quilt with colors from my Aurifil’s Subtle Strings collection.  You may read more about the collection here, and exactly why those shades are chosen.  You may also order the thread collection from heresubtle1-1

subtle2

And you will see how the Subtle Strings colors meet in the following close-up pictures.

sept15d

sept15e

sept15g

sept15h

sept15i

sept15j

sept15k

And here is a quick look at what the back looks like.

sept15n

That’s it for my Thread Journey 2.0!  It’s been such a fun journey for me being able to quilt to my little heart’s content on this one.  You may find the instructions on how to construct the quilt, as well as quilting suggestions here.

Come back tomorrow for the announcement of the giveaway winner of Windham’s Maribel FQ bundle.  Have a lovely rest of your week!

Project Sneak Peek: Packages

Hello Friends, how are you all doing this Wednesday?  I hope you are well.  I am excited to show you this free-motion quilted Christmas motif I quilted on my most recently completed quilt!

IMG_4122

The best machine quilting advice I can give anyone is to keep quilting because you WILL get better. :)  That’s all for now.  I have to get back to work…  Hugs to you all!

Thread Talk From My Sewing Machine #69

thread-talk1

Hello Friends, I hope you are doing well.  Things have been a little chaotic over here… probably an understatement, haha!  But we are doing well.   Despite the beautiful cherry blossoms we saw last week, we are waiting for the slightly warmer weather to keep getting warmer. :)

blossoms

Last week, I stitched out a Mandala design using my Subtle Strings threads.  This Mandala design was stitched out as part of QuiltShopGal’s Bee Creative Charity Project.  Click here to read more.  QuiltShopGal also showed my pencil sketch schematic of this stitched Mandala in her post. You are free to use it as an inspiration for your quilting.

SubtleStrings-Large-Outside

SubtleStrings-Large-Inside

Sometimes, a little subtlety goes a long way, yes?  To illustrate how subtle the colors of my Subtle Strings thread spools are, I contrast them against a solid black background.  The flower center is stitched with Aurifil 40wt threads in the bright and loud shades in order to give contrast to the colors and the 50wt threads I had chosen for Subtle Strings.  All 12 Subtle Strings colors are stitched in the 12 outer petals.

IMG_3484

It’s interesting to me to see how the colors look SO different when wound on spools vs. when they are stitched out. In this case, when the thread is stitched out (without the effect of the collective rounds of wound thread), you might even say some of the threads are subtly similar in shades — thus the name, Subtle Strings. :)  Take a look at the corresponding colors to the stitched petals, and you will quickly see the effect of “collective vs loner”.  For example, that yellow thread doesn’t look so yellow after all.

IMG_3489

My two cents:

#1.  ALWAYS, always (!) audition the color of your threads but pulling a thread by itself and lay it against your fabrics to see if you like the thread color on your quilt, instead of laying the entire spool on the fabric for audition.  Of course that is the lazy way.  You can always actually stitch out the colors on actual fabrics if you are the very responsible kind, haha!  As for me, I tread the quickest path that gets me to the actual quilting part.

***There are logical reasons to my Subtlety (see below):

#2.  Interchangeable shades — that means I have used the similar shades of colors TOGETHER in a quilt in the situation where I ran out of one color during the quilting process, and proceeded using the one with the similar shade.  The effect is almost unnoticeable (unless inspected up close), especially with those two blue shades.

#3. The top center cream shade is my favorite neutral shade (#2130) that I use to piece AND quilt most of the time.  BUT, I have also learned that the other shades (like the light pink, lavender, light blue, gray and taupe) are suitable for piecing as well – even for light fabrics.  So, if you have threads in subtle colors laying around, use them like you would a neutral thread in your sewing!

#4.  The softer colors accentuates the texture of quilting if you want the effect of your quilting not overpowering.

The following picture shows what I call “lemonade” quilting.  The thread is the light pink quilted against a yellow fabric:

IMG_9742

#5.  I also picked those shades for hand applique purposes because those shades blend well in securing the applique pieces onto background fabrics.  I read somewhere a long time ago to no pick loud shades for hand applique.  And I have always used subtle shades for hand applique.

wip

#6.  And of course all the Subtle Strings threads are in 50wt.  The reason being, for those starting out with domestic machine quilting, I always encourage them to use the finest thread they can find.  I started out using 100wt silk (you can read more about it and see more pictures here).  As I taught domestic machine quilting, I had found that the 50wt really gives the students the best results that eventually confidence in them to continue in domestic machine quilting.  [From my personal teaching experience, it has to be the Aurifil 50wt that gives the best result!  I would hand out 50 wt threads to student who are struggling in class to have them just try the thread – they are always amazed at the difference the thread makes!]  So, the 50wt is definitely a great weight to start!

#7.  When used for quilting, I find that the 50wt masks mistakes really well, and oftentimes that is what give beginners the initial confidence to keep on quilting on their domestic machines.

#8.  The 50wt is my favorite weight for piecing.  I think that the 50wt helps with achieving precision in piecing.  I found that subtle shades of pink, green, blue or yellow work just as well color-wise as the neutrals in piecing!

My Color Burst quilt comes to mind – that quilt was completed from start to finish (finish means bound and set to the magazine editor) in 5 days.  I have to say it wouldn’t have been possible for me to do had it not been the Aurifil 50wt threads that helped me so much in achieving the precision in piecing.  Keep in mind these HST finish at 1 1/2″ square.

IMG_4736

IMG_1405

I think I finally ran out of my 2-cents on being subtle here. :)  I hope you will look and see what threads you might have to stitch them out, just to see how they would look on fabrics like I did with my Subtle Strings colors on a black. I will have more projects like that to show and share with you this year — and hope that you will make experimenting a point in your quilting journey this year!

IMG_3503

You may contact Donna at www.followthatthread.com to order your own Subtle Strings collection.  A big shout out to Quilters Newsletter for including the collection in the Staff Picks section of their latest issue (April/May 2016).  Have you see my Tartan Links quilt in that same issue?

QN Subtle Strings

Alrightie — Friends, I am going to have a date with my Aurifil 50wt threads as I have to get a quilt top pieced and shipped out tomorrow.  I hope you have a most lovely weekend!  Quilty hugs to you – whether you are a quilter or not.

Thread Journey: My Quilting Heart and Soul & Behind the Scenes!

You might empathize with this sentiment…. sometimes you just sink your entire heart and soul into a project, not necessarily quilting.  My Thread Journey is my most recent heart-and-soul (quilty) project!  It was made as a companion piece for my Subtle Strings Thread collectionYou may remember it hanging at Aurifil‘s booth at Fall Houston Market last year.  You have seen pictures of the quilt quite often on this blog post-Market…

WS DRAFT2

Thread Journey is my heart-and-soul project because I sought to encompass all that I have learned about quilting (particularly domestic machine quilting) since I took up quilting in 2005, from not ever touching a sewing machine to the present.  It is a quilt of my own original design, and I stayed up many a night just thinking about the design, and colors!  The quilt also has little details from my previous quilts to tie in the “journey” part.

IMG_1923

Thread Journey is being shown in Alex Veronelli’s (of Aurifil) lectures this year.  A great honor.  I actually have a “behind the scene” story to share about Thread Journey.  I would like the story to be more dramatic, but it isn’t really.

IMG_1838

September through November last year were probably the most stressful months I remember experiencing the entire year last year.  I had three trips to make within the span of 3 1/2 weeks that included Market, teaching at Annie’s Craft Festival, and filming three new online classes back to back.  And of course, with each trip, I had to carve out a large chunk of time to make sure things are in order at home (i.e., laying out Miss Baby’s clothes, getting her schedule written out etc) before I could leave in good conscience.  And then, there’s packing props and things which always make me feel uncertain because I was scared to death I would forget something!!!

And of course, a huge (not size, but of importance) prop that I was bringing with me to Fall Market last year was my Thread Journey quilt… because it was going to hang at Aurifil‘s booth!  I took it with me in my carry-on, for fear of losing it if packed in my checked baggage.

IMG_1803

I had fallen sick right up till Market… so, that hampered the progress of my work quite a bit.  I managed to finish quilting the quilt the night before I was to catch my flight to Houston.  I remembered having lunch with Miss Baby on the day I left because I knew I won’t be picking her up as I usually do.  Then off to the airport I went, sharing a van ride with a couple of very cool veterans, one of whom is now an accomplished artist!  As much as I enjoyed the navy officer-turned-artist story, I was thinking about… how unfinished my Thread Journey was:  the binding was not done, the yoyo’s weren’t made, the hand embroidery not yet completed…

IMG_1852

Now, you are SO un-impressed by the way I roll…. yeah, I can understand why!  Last year was an exceptionally busy year for me!   Long story short, I slept little night after I checked into the hotel, and managed to finish up the quilt exactly at 9:45am the following morning when I was supposed to bring by the finished quilt, my heart-and-soul quilt!  That sense of relief — it is unexplainable!!!!  Hearing quilters’ kind words on the quilt at Market meant the world to me.

I was able to have Thread Journey back with me for a few days last month.  For the first time after I completed the quilt, I relived the moments of making the quilting up to the finishing point…. I realized it truly has been a journey!!! I took quite a few more pictures before I sent it on its way again… the following is one of them:

Threads Journey

AND – the journey is continuing, so to speak.  I am re-making this quilt, and will be offering this design as a free pattern in the near future so that we can share a quilting journey/adventure together.  Check back on this blog, and stay tuned for details!

p.s.  If you are new to this blog, Thread Journey’s Fall Market adventure is documented here.

Giveaway: Annie’s Machine Quilting Level 2 Online Class

Hello Friends, I did mention to you there would be an imminent giveaway, and well, the giveaway is HERE, TODAY! :)  Annie’s is sponsoring the giveaway of a copy of my Machine Quilting Level 2 online class.

Level2b

This free-motion quilting class covers slightly more involved quilting motifs (compared to the ones in my Learn to Machine Quilt class) by working on this class project, and quilted using a domestic sewing machine.  I will be stitching along with you ALL the motifs you see in the pictures of the class project below.  Due to time constraint, sometimes I would just let you finish out a section and move on to the next motifs.  BUT, I will get you started.

level2c

IMG_8133

The class is yours to keep once you win it – you may access the class anytime you wish!  You will also get a chance to interact with me should you have any questions.

After completing in the class project, you will have a chance to make 3 additional projects (instructions included in the class) that will give you a chance to quilt the motifs you learn from the class project on the additional projects.

Additional Project #1: Quilting a pieced quilt with Star Bright:

level2d

IMG_7965

Additional Project #2: Quilting an applique quilt with Carolina Tulips:

level2e

IMG_7970

Additional Project #3: WOW Project with Fanciful

2199845900_04B_Fanciful

IMG_0321

IMG_0309

Here are a few comments from the official class page on Annie’s:

“I was not confident to do quilting. But listening and following your classes has made everything simple for me to follow. I have started quilting now. Nice and well explained.”

“I have been following Wendy on Ivory Spring for several years and love her feather work… I have tried to make your feathers for some time and your demonstration “fix me real good.”

“Wendy does a great job of breaking designs down so they are easier to quilt. She is a wonderful teacher and is very pleasant to listen to. I love everything she does and would definitely sign up for a feather class if it is ever offered.”

Awwwww – THANKS… I am made the happiest of quilters with the feedback!

In order to enter to win the prize:  Just leave a comment or about what you look for in an online quilting class between now and next Thursday (January 14, 2016).  Winner will be announced and contact on the following Monday!  Open to international quilters!

And that’s if from me for today.  I am running late this week, and desperate need to get something solid accomplish before the weekend.  School started this week, and we had a slightly rocky start.  First, Miss Baby had so much fun during her Christmas break she was most un-enthusiastic to go back to school.  So, I made her favorite cinnamon raisin break on the first day of school as a “pick me up”, only to realize an hour before she woke I had forgotten to add the yeast!!!  Then, we found out she forgot her lunch box after we got to school that first day.  So, Mom had to make a second trip back to school to deliver the lunch box.  And then, I have been doing house-keeping stuff for work to move and hopefully “propel” me to productivity.

Thanks for stopping by!  Hugs to you all!

Thread Talk from my Sewing Machine #65

thread-talk1

Hello Friends, I am happy to share with you a “faux” long-arm free motion quilting motif that I have quilted on my latest completed quilt.  I am going to show you how “quilting off the seat of one’s pants” works out in real life using a piece of paper.  The goal is to fill the paper with the motif — exactly like how we would quilt an allover quilting motif on a quilt.  So, first let’s look at the progression of filling up a space with quilting motifs, starting from #1.  The different colors denote different repeats of the motif.

IMG_1430

IMG_1432

So, here you see I “quilted” #1-9 with not much of any abnormality.  I do want you to note how I always have my “starting” swirl of each repeat going a different direction — as much as I can — that gives the overall effect a sense of movement!  I also want you to notice that the leaves aren’t in any particular shape as long as they taper inward, as well as the filler swirls I use to fill up some open space that is too small to fit another repeat of the motif.

IMG_1434

I sort of quilted myself in a corner at #9, and have no convenient to get out to fill the remaining open area.  No big deal, cut the thread, and find a convenient spot to start again.  Thus #10 and so on, until an entire area is filled up.

IMG_1436

IMG_1439

Here is what is on paper transferred to a real quilt looks like on the back of my latest completed quilt…

IMG_1424

IMG_1422

Curious what the quilt looks like on the front?  I am afraid you have to wait.  All I can tell you is that my husband loves the quilt.  He has great taste, because he…. married me!  HAHA.  Please note I am totally cracking a lame joke at that one!  Alrightie, I shall catch up with you later!

p.s.  You may click here for my other Thread Talk posts.