Thread Talk from My Sewing Machine #57

thread-talk1

Hello Friends, I hope you are well.  I am happy to share a little more about my “Roundabout Feathers”, as dear friend Joyce calls them.  Joyce gave me her permission to coin the name “Roundabout Feathers” for these fun feather wreaths with a twist!  These feathers are free-hand quilted with very minimal marking, as shown later.

IMG_5529

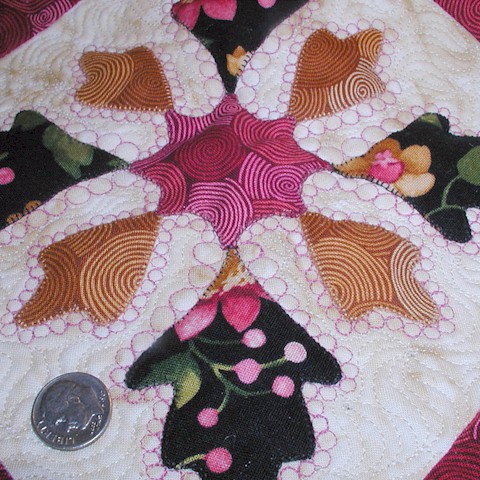
[Sorry about that little piece of lint in this following picture!]

IMG_5533

IMG_5532

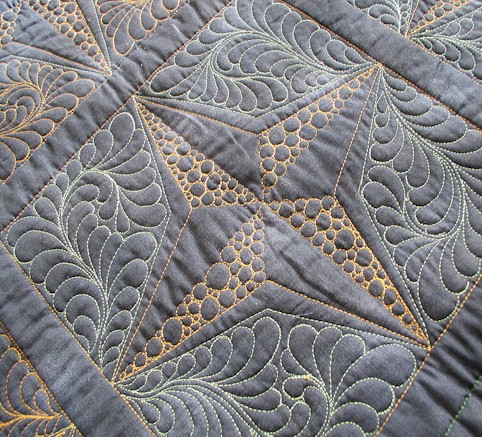
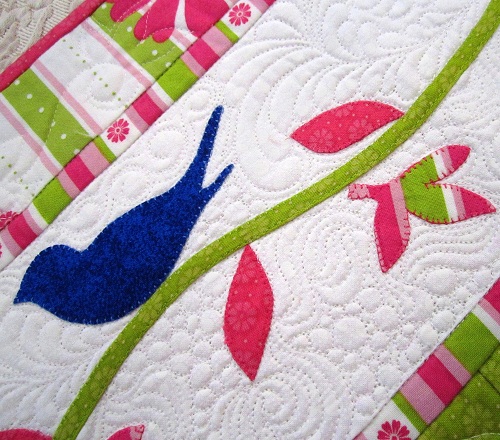
SO — you have this open space that is perfect for quilting something feathery!  For this particular quilt, I have A LOT of open space that I needed something feathery…. but I wanted to add visual interest to the feather wreaths, and not have all of them look identical… so I thought off-centered and concentric wreaths would do the job.

First, I looked through my piles of dishes, and found two bowls – one large, and one smaller.  You can decide what sizes work for you – just make sure one is smaller than the other.  And I then trace the circles on the open space.  The circles then form the spines of the wreaths, and are the determining factor of the placement of your wreath.

IMG_5558

The key is to remember the inside feathers of the inner ring MIRRORS the outside feathers of the outer ring, as shown.  You can definitely mark the orientations of the first feather on each ring before you start if the feather wreaths on your quilt are direction-specific.

IMG_5559

Then, you would start filling the outside of the outer ring, and inside of the inner ring with feathers!

IMG_5561

Then, it’s time to feather the inner feathers of the outer ring.

IMG_5563

For the outer feathers of the inner ring, I don’t do “full” feather lobes on some of them just to give the eye a bit of rest — instead I quilt the effect of overlapping feathers, as shown in the schematic.

IMG_5564

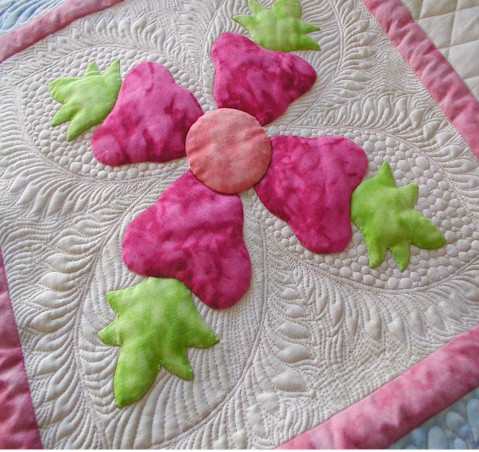
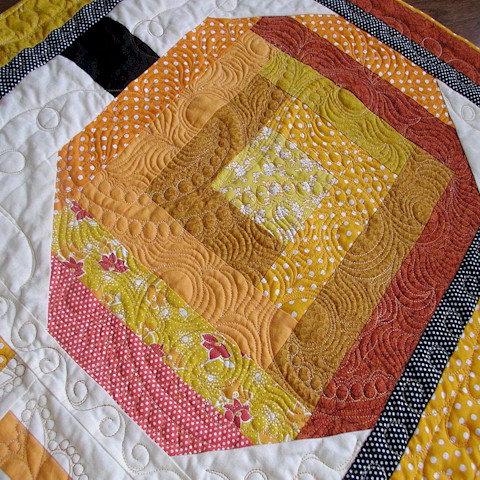
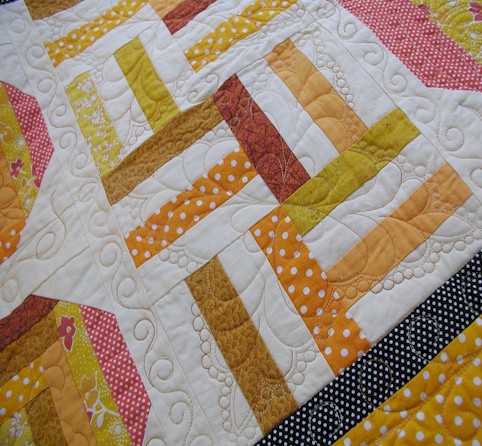
I find these roundabout feather wreaths to be very versatile.  I can place them wherever I want on an open space, and I can decide how large or small my rings would be, and thus further customizing their appearances.  I hope you can see what I mean with the pictures of the wreaths quilted in real life that I had shared with you earlier in this post.

I hope you will give these wreaths a try!  Curious mind would love to know what you think of them! :)

IMG_5516

Thanks for stopping by.  I hope you have a lovely week!

***

Click here, here, and here to read my other Thread Talk posts on quilting feather wreaths.

Thread Talk from My Sewing Machine #56 / Priscilla’s Garden Party Final Sneak Peeks

thread-talk1

Hello Friends, it’s lovely to have you visit again.  For some reason, I just felt the traditional feathers won’t work on Priscilla’s Garden Party.  So I experimented with square/flat tipped feathers, and I loved the effect.

IMG_5466

IMG_5469

To quilt the square tipped feathers, I start with a spine as usual… except my backtracking quilting path won’t work like it does in the traditional round tipped feathers, described here.  The following shows the general idea, and once you get the general idea nailed down, you can easily add your own embellishments to spice things up a bit!

IMG_5471

IMG_5472

After that first feather, I proceed to add more feathers.  The overall look gives an open and airy feel, and reminds me of Chinese firecrackers.  I shall affectionately call these feathers my firecracker feathers!

IMG_5473

Food for thought, and for further experimenting… what if we quilt swirls overlaying the firecrackers in contrasting threads on a solid background, perhaps on an Amish quilt?  I tend to think the visual effect would be quite interesting.  What do you think?

IMG_5474

Thanks for stopping by, Friends!  I hope you have enjoyed my latest Thread Talk installment.  I hope you have a lovely rest of the week!  I shall catch up with you later.

Visions of Azure: Sneak Peek / Thread Talk from My Sewing Machine #55

thread-talk1

Happy Monday, Friends!  I hope your week got off a great start.  I look forward to visiting your blogs to see what you have going on this week.  I was able to finish off a quilt to send off before the weekend… here is a sneak peek of Visions of Azure:

IMG_5315

Oftentimes, my planned quilting scheme doesn’t work out when the actual quilting starts… and such was the case with Visions of Azure.  I had planned to quilt formal feathers.  But in the end, I decided that I needed an airy feel for the spinner blocks, and the feathers would end up making the overall look too stuffy.   The new quilting scheme turned out to be a fun way to quilt spinner blocks,  and I share with you the schematic in the following.

Starting from the spinner center, I quilt a curve to about the mid-way of the long side of a parallelogram, and then round off with a tip at the top of the parallelogram, before curving back down to about the mid-way of the long side of the parallelogram – at the other side, before curving back down to the spinner center.  I then echo once.

IMG_5317

Then, it’s a matter of filling in with fillers like tendrils, swirls etc.

IMG_5318

See what I mean about the airy feel when quilting my spinner blocks this way?

I look forward to be able to show you the quilt in its entirety.  Stay tuned for details.  Hugs to you all, and have a very lovely week.

Repetitions : Sneak Peek

Hello Friends, I am happy to share with you my “blueberry pie filling” quilting motif.  Don’t the quilted pebbles look like blueberries nestling oh-so-snug in a pie crust?  This motif illustrates another application of “pebbles”.

Click here to read about how I quilt pebbles/circles.

Click here to view the quilts on which I have quilted pebbles.

Click here for my “Learn to Machine Quilt” class (online or DVD) that covers how I quilt pebbles.

IMG_4003

I quilted “blueberry pie filling” on a recently completed quilt, Repetitions.  It should already be at the editor’s by the time this post goes live.  Here are a couple more sneaky peeks for you.   Can you see the very light gray threads I used for quilting the quilt?

IMG_4010

IMG_4016

The quilt uses fabrics from an upcoming Lynette Anderson‘s fabric line Quilters Garden.  It is Lynette’s debut line with RJR Fabrics.  I have MUCH more to share about Quilters Garden.

6a00d83455610269e2019affed3f6f970c-400wi[image source: Lynette Anderson]

Be sure to check back early next week for details!  Thanks for stopping by.  God’s blessings on you all!

Thread Talk from My Sewing Machine #54

thread-talk1From my experience, feathers are probably one of the least forgiving quilting motif.  Sometimes I look at the feathers I quilt, and I can instantly tell whether they are on or off.  I have discussed the anatomy of an “on” feather here.  And I think the key is really that curvature that we round off in forming those feather lobes.

feather3

IMG_4264

So, the question becomes how does one practice this almost mystical rounded curvature?  I personally don’t really like to practice for just practice.  I like to actually still achieve something when I am practicing.  I had a light bulb moment when I was quilting these “pseudo” informal feathers on my Woodland Snapshots quilt a few weeks ago.

IMG_3433

These pseudo feathers are much more forgiving and much easier to quilt, and I think they provide the perfect opportunity to practice that rounded curvature in the midst of the quilting process.  I hope the following schematic helps.  The basic idea is to form a feather lobe (solid line), but after the rounded curvature is formed, I would echo along the previously stitched lobe (dotted line) to return to the spine before forming the next lobe.

IMG_3529

The goal is to form the lobes with a curvature as gracefully round as possible.  I have shown in the following some lobes that are kind of “off”.  Hopefully you will be able to compare the shapes of your feather lobes when they are “off” and see what I mean about the rounded curvature… and more excitingly you are on your way to quilting more “on” feathers than “off”.

IMG_3532

Here you see more of the pseudo feathers in action.  You will notice that not all are perfect, but as a whole, these feathers are forgiving.  I gained some insights as to how to better round off that curvature when I free-hand quilt my future feathers.

IMG_3427

Also, I have meant to mention to you that my online “Learn to Machine Quilt” class has been made into a DVD.  For those who find it a little tedious to have to follow the class via the internet on a computer and prefer to pop the class into a DVD player – it is available for you now!

Click here to read more about the class.

Click here to purchase the class online, or DVD.  By the way, the online class (NOT DVD) is offered at 50% AGAIN!  Do take advantage of the great deal.

Click here, and here to view students’ projects from the class.  I will be posting more pictures from students in the very near future.

Thanks for stopping by!  Happy Quilting, and Happy Weekend – everyone!

Thread Talk from My Sewing Machine #53

thread-talk1Lookie here, cross-hatching (with the hand quilted look) is vogue!

article-2416433-1BB8BC06000005DC-237_634x778[image source: Daily Mail UK news article]

Of course, cross-hatching is not new to us quilters.  Many traditional and antique quilts were quilted cross-hatch.  Though simple, cross-hatching gives the look of order and textured elegance that withstands the test of time.

Following you see cross-hatching on my own quilts, quilted anywhere between 1/4″ to 2″ apart, straight and curved.

Ivory Spring, Quiltmaker’s Quilting & Embroidery (Summer 2008):

 Quilting Around the Pieced Block, Quilter’s World (February 2011):

QATBe

Quilting Around the Applique Block (Quilters World, April 2011):

QATB2_10

Thanksgiving Topper (Quilters World, October 2011):

Thanksgiving Topper3

Kitty Collage (Quilting & Embroidery, Spring 2007):

Farm Crossing, publish pending:

IMG_5474

I have learned a few things about cross-hatch quilting using my domestic machine:

1.  Make sure the lines are marked as accurately as possible for maximum visual effect.  This it the part I tend to not do a good job because all I want to do is get to the quilting part.  But the time invested in marking is always time well spent.

2.  The effects of cross-hatching 1/4″ and 1″ are vastly different.

3.  I love to use wool/silk batting for dense cross-hatching because the individual diamonds just POP!

4.  For cross-hatching far apart, I think I still prefer to use a cotton blend (80/20) because cross-hatching on silk/wool batting looks a bit “loose” and unkempt to me.  Don’t get me wrong, the cross-hatching on silk/wool batting doesn’t look bad at all.  It is just a matter of personal preference.

5.  Cross-hatching over applique pieces gives a rather soothing and blended look.  I like it.  Don’t get me started on cross-hatching on a whole cloth quilt – the effect is simply divine!

6.  I can quilt straight lines  (almost!) free-motion, but I still like to use my walking foot to quilt straight lines because I demand the look of uniformity when I quilt straight lines.  That makes the needle down function come in really handy!

7.  When I quilt cross-hatches, I try to pin my quilt as close as possible in the basting process.  Free-motion quilting is great to quilt down any slack on the quilt top if a quilt isn’t properly basted, but not so when I quilt straight lines with my walking foot.  I also starch press my quilt top pretty well before I baste when I know I will be doing cross-hatching.

Anyway, those are a few tips and tricks in my quilting toolbox concerning cross-hatching.  I would love to hear your additional tips for cross-hatching!

Thanks for stopping by.  I hope you are enjoying your week.

Thread Talk from My Sewing Machine #52

thread-talk1Hello Friends, every now and then, I receive questions on how close I pin baste my quilt sandwiches.  I thought I would share with you an in-action photo from a quilt I completed a couple of weeks ago.

IMG_5348

My general approach to pin-basting is “pin it to death”.  My pins are about 1 1/2″ to 2″ apart, closer if the quilt is to be a special heirloom or show quilt.  I probably don’t need to have my pins so close, but I like to be safe than sorry.

Now, if you look at the photo again – you will see I take out enough pins to make an area (~4-6″ radius) around the needle for quilting.  I often stop while quilting to take out pins.  If in doubt whether a pin is going to be in my way, I’d go ahead and take the pin out.  I always regret it later if I don’t…. ask me how I know, ha!

If you have any basting tips (not necessarily pin-basting), please feel free to share.  I am always ready to learn something new, and there is plenty to be learned for sure in the vast world of quilting.

Thanks for stopping by.  I’d better get back to work.  Till later!

***

Click here to read my other Thread Talk posts.

Thread Talk from My Sewing Machine #51 / Virtual Trunk Show #11

thread-talk1

Hello Friends, this is a lumped together “Thread Talk” and “Virtual Trunk Show” post.  I am subtitling this post, “Pebble Power” – you shall see what I mean!  I hope you will be able to see just powerful these pebbles are in adding to the look of your quilts!  Feel free to click on the quilt names for further pictures of the quilt.

1.  Flower Duet (American Patchwork & Quilting, June 2012)

IMG_1448

2.  Starry Pursuit (Fons and Porter Easy Quilts, Winter 2011)

starry pursuit6

3.  Solace (Quilt Trends, Spring 2012)

IMG_1792

4.  Quilting Around the Applique Block (Quilter’s World, April 2011)

QATB2a

QATB2c

5.  A Tale as Tall as a Tree (Quilter’s World, October 2012)

IMG_3313

6.  Garden Mist (Quilter’s World, Summer 2013)

IMG_1448

7.  Winter Bouquet (The Quilter, December 2011/January 2012)

winter bouquet13

winter bouquet4

8.  Sweet Meadow (The Quilter, August/September 2012)

IMG_2940

9.  Pumpkin Patch (Log Cabins Today, House of White Birches, 2011)

pumpkin patch1

pumpkin patch7

10.  Christmas-tide, publish pending

IMG_5254

I hope these pictures give you some ideas on how to use pebbles in your quilting.  I also covered the pebbling technique in my online “Learn to Machine Quilt” class.  You still have time to enter my giveaway of a free class here.

Learn to Machine QuiltClick here to view my previous Thread Talk posts.

Click here to view my previous Virtual Trunk Show posts.

Thanks for stopping by.  As always, I appreciate all your comments!  Hugs to you all.

Thread Talk from my Sewing Machine #50

thread-talk1I want to tell you I do so love my eagle-eyed friends that come to my blog — whether in spotting my featured projects in magazines before I do, or noticing details in the pictures I share on this blog.

Dear Joyce made this comment about the following picture shown in this post… “I just looked a bit more carefully, I like the way that you added pebbles to fill up a space not taken up by the feather. Very clever and it really adds to the overall look of the quilting.”

IMG_1982

Unbeknownst to Joyce, I have been planning a Thread Talk post dealing with the background quilting on the negative space in feather quilting to make the feathers POP even more besides using the appropriate type of batting (click here and here to read past Thread Talk posts)!  Note the scale of the background quilting…

IMG_1981

The scale of background quilting compared to the feathers is… tiny!  In order to make the feathers stand out, the scale of background quilting has to be times tinier than the feathers.  To pop my feathers, I normally try to quilt the negative spaces (if I decide to… sometimes I don’t) with a scale as small as I can manage.  Don’t panic though, I find it is easier to quilt small and tiny in many cases.

Many of you might have not seen my Harrison Urn quilt block (based on Susan McCord’s quilt) I quilted way back when.  Feel free to click here to view more pictures of the block.

Meanwhile, Happy Quilting!  Remember to quilt them small when it comes to background quilting!

p.s.  Can you believe we have reached our 50th Thread Talk installment?!  Thanks so much for your encouragement on my past Thread Talk posts.  Your encouragement has kept me going… Stay tuned for a giveaway!

Thread Talk from my Sewing Machine #49

thread-talk1Don’t feel like making 9-patches?  Don’t worry, just quilt them!  [Do make sure in this case the length and width of the block are divisible by 3 for the 9-patches.]

IMG_5198

Using the same concept, I have also quilted the outline of applique shapes on blocks for extra visual effects when I don’t feel like actually doing the applique.  You can click here to read about my “mark without marking” method when quilting the applique shapes.

Autumn Panel4

Easy peasy, isn’t it?  I hope this gives you more ideas on “what to quilt” on your quilts!

Thanks for stopping by!  I shall catch up with you tomorrow.

Thread Talk from My Sewing Machine #48

thread-talk1

Hello Friends!  I hope you are doing well.  My “Twirly Whirly” quilting motif should be self-explanatory in the following images.

IMG_5121

IMG_5122

IMG_5123

These twirly whirlies are perfect for allover quilting, strip quilting, or sashing/border quilting!  I tested them on my most recently completed quilt, and will definitely be experimenting and practicing with them in the future! [Sadly, my pictures didn’t quite turn out… that’s why I have no photos to show.]

Thanks for stopping by.  Happy Quilting.

Thread Talk from My Sewing Machine #47

thread-talk1

It is true you can find quilting inspiration EVERYWHERE, ha!  Just look at the image below.  It’s taken from this morning after we had another round of snow.IMG_4982

It’s Diane Gaudynski’s Apple Core motif that I found at the bottom of my shoes this morning!!!  The following images are the apple core motif I had quilted on Marabella, one of my quilts made in 2010 — which seems a lifetime ago.

Marabella17

Marabella18

See what I mean about inspiration being everywhere?!  Thanks for stopping by.  I wish you a very Happy Monday and Happy Week!

IMG_4983