I thought I would show you my normal stitching schematic before we dig deeper into this feathery business. As you can see from the diagram below:
1. I work on my feathers one side at a time. I tend to have better control of how my feathers turn out. I do want to at some point work on doing the simultaneously feathers on both sides. I have done it a couple of times, but didn’t find my work satisfactory.
2. For regular “everyday” feathering, I do the backtracking shown in the diagram. Note, the dashed lines simply means you will stitch over the same spot again to get to the point you would start a new lobe.
And now, concerning those individual “lobes”… I think how your feather lobes look determine the appearance of your entire feather plume. It is definitely a worthwhile investment of your time to sit down and draw out how best to execute your lobes. Some like theirs slender, while some like theirs to be a bit more full. I like them both, and try to incorporate both in mine when I can.
From my own limited experience, the anatomy of a good feather plume consists of:
1. Smooth curvature on the feather lobes.
2. The width of the feather lobes should decrease as the curvature approaches the spine.
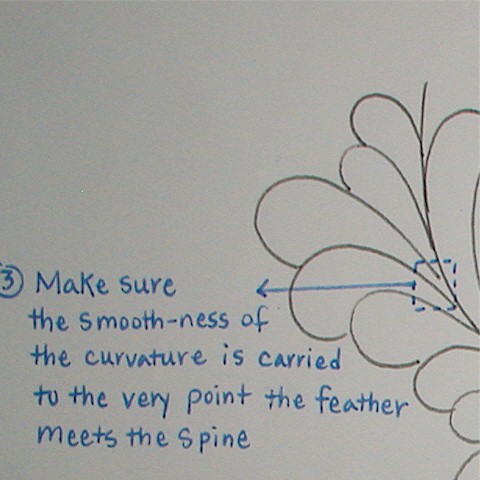
3. You know that curvature… make sure the smooth-ness persists till the bitter end where the feather lobe meets the feather spine
4. I like to backtrack along my previous feather lobe until it is about halfway before starting off with a new lobe. I find that my new lobe looks more substantial that way.
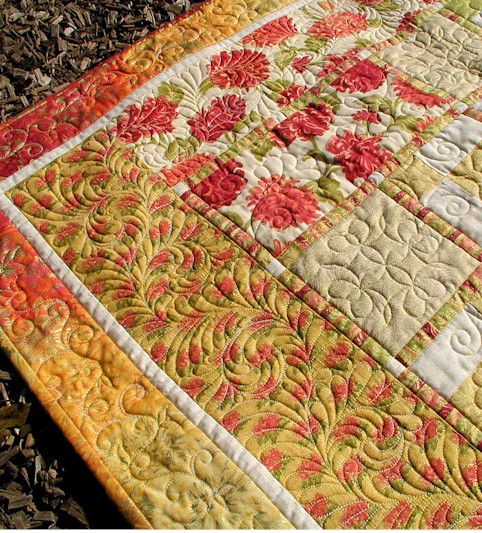
Now, how about some real life feathers so that you can spot the aforementioned principles? Being able to spot what you are looking for in your own feathers is the first step in beautiful feather quilting. I can say that because I spent hours and hours and hours just staring at master quilter’s feathers!
I hope this is helpful to you to first diagnose why you don’t like your feathers, and hopefully begin your journey in fixing certain quirks to help you better quilt your feathers. Stay tuned for my next Thread Talk post dealing with the issue of perspective in feather quilting. In order to do the perspective in an attractive manner, you will have had to master your lobes! So, get busy and get drawing, will you? :) Thanks for stopping by. Have a great weekend.


Wonderful details in your explaination. Ok, I will try again and again. Thanks so much for taking the time to share your experience.
Oh my goodness! This is amazing! Thank you so much for sharing your talent. Do you mark your quilt for feathers or just go freehand?
Also I got my Easy Quilts today and the first quilt I looked for was yours :D
So beautiful!
Hugs!
Sue
I generally mark only the spines as a guideline as I often end up veering off the beaten path and do my own thing in the actual quilting process. :)
WS
thanks for showing me how you do your feathers. Do you quilt the spine of the feathers first? If I missed that info in the post forgive me.
Thank you thank thank thank you! I’ve been hoping you’d do a tutorial like this one. Now to practice for a few thousand hours!
Wow, thank you for such great instructions on such beautiful feathers. I can’t wait to try them out. The photo with the black and gold feathers is spectacular!
So cool! Your directions are in depth – broken down into micro steps. For those of us that are attempting these feathers, your directions are wonderful. Thanks so much. Plus, always enjoy seeing your quilts.
I’ll never attempt them but I sure enjoy looking at yours – you are amazing!
Oh, honey, it’s not your fault….you’re trying so hard to make sense, and you probably do, but I still don’t get it! But, that’s ok, I looooove looking at yours! :) Many thanks for the explanations. I will save the link, and one day, some day, well, a girl can dream.
Fantastic and valuable information Wendy. You explain it all so helpfully :)
I think you should be writing a book!!
How great that you took the time to share how you do your feathers. Thank you so much for all the lessons you have given us. I really appreciate your sharing your pictures and how to’s.
Thank you for sharing these tips. I’ve only tried feathers on practice pieces, but they are always wonky. I couldn’t figure out why until I saw your diagram. I seem to straighten out the feather as I approach the spine. I’m going to try them again armed with the information you’ve given. Thanks!
Your feathers are spectacular,now if I could only draw one on paper LOL. I am so not an artist. I will however try as you make it look easy. Such talent you have thanks for sharing. Hugs Bunny
That was telepathic wendy…i was thinking of this since last 2 days…and i was about to check your previous thread talks to see if you have already explained this…Thanks a million for sharing this.
I have one more doubt…do you draw all this feather image before you stitch or make it a feather as and when you quilt…your quilting is awesome…Thanks again for sharing all the tips.
Beautiful, your tutorials are well written and photo’s clear and understandable. I too love feathers, but they are not always wanted by some customers :-(………. but that’s Ok.
Thank you very much for this very good lesson about feathers. I saved it to practise it next time. You are a good instructor. I enjoy to hear more about quilting and how to do it.
Greeting Guilitta
And thank you very much for your visit on my blog.
Wow thanks for sharing this. I never knew there had to be so much thought into a feather. I’m definitely bookmarking this for the future. Thanks so much for sharing.
Good tutorial! I make wonderful feathers with hand quilting, big swaying feathers that curve around the quilt. Now, to only transfer that to my DMQ.
have a lovely weekend and will “see” you next week!
donna j
Excellent tutorial, Wendy! So kind of you to take the time to do this. I’m going to take some time to study this!
Thanks for the tutorial on feathers. I am a little clearer on what to do. I just need to get in there and draw and practice.
It’s really hard to beat the look of feathers. Yours are simply gorgeous! Thanks for the tutorial.
Wendy, you make the most beautiful feathers I have EVER seen! I can’t accomplish this on the longarm and you do it on a domestic machine. I am in awe of your skill.
Thank you for sharing your technique. I’m going to print it off and practice.
Have a wonderful Thanksgiving!!
When your quilt pattern goes into a magazine (which it always makes it there/ so gorgeous) does your feather plate drawings end in up in the pattern section? I have seriously tried to draw feathers and mine are horrible next to yours.
Excellent tutorial, Thank you for sharing.
Hi Wendy ..this is great ..u give me that little “I can do that” feeling , thanks!
I’m practicing; I’m practicing. Thank you. Somehow, with you as my teacher, I am filled with confidence.
Pingback: Thread Talk from my Sewing Machine #29 « Ivory Spring
Pingback: Thread Talk from my Sewing Machine #29 « Ivory Spring
Pingback: Quilting related by sheryled - Pearltrees
I have loved reading this agin – you are such a tallented lady
Pingback: Thread Talk from my Sewing Machine #30 « Ivory Spring
Hi Wendy,
Thanks for this explanation; I first read it in conjunction to the FMQ challenge hosted by SewCalGal and now I’m back here reading in greater detail because I am not getting it. I so wish that I could be in your sewing room for a hands on demonstration. Sometimes being right there makes the difference.
Pam
Pingback: Thread Talk from my Sewing Machine #33 « Ivory Spring
Pingback: Thread Talk from my Sewing Machine #37 « Ivory Spring
Pingback: Sarah’s Feathers « Ivory Spring
What do you do about ends of threads? I am assuming that you do not stitch a continuous line. You must have to stop and start somewhere. Do you knot them off and thread them through the fabric or what?
Pingback: Thread Talk from my Sewing Machine #41 « Ivory Spring
Pingback: Thread Talk from my Sewing Machine #43 « Ivory Spring
Wendy, I’ve FINALLY gotten up the courage to try feathers, after doodling them for months as practice. I have a question about the spines, though. I am having trouble doing the spine smoothly and even the way Diane Gaudynski shows in her book, where you start at the bottom, go up to the top and make a little Q-tip bump, then quilt back down again about 3/8″ away from the first line before starting feathers. I see that your spine is a single line, but I’m not sure how you quilt that in. Do you start quilting the spine from the top, quilting towards yourself and then starting your feathers at the bottom? Also, how do you get back down to the bottom to quilt the feathers on the other side?
Pingback: Thread Talk from My Sewing Machine #54 | Ivory Spring
Thanks for your insight, you always add to my understanding. Just wish I could execute as you can. kws
Thank you, thank you Wendy for your awesome feather tutorials. I linked to you here: http://karensquiltscrowscardinals.blogspot.com/2014/02/a-finish-simple-delightful-flowered.html
purchase Brand Viagra
…..
Pingback: Thread Talk from My Sewing Machine #61 | Ivory Spring
Pingback: Thread Talk from My Sewing Machine #64 | Ivory Spring
I JUST ADDED FEATHERS TO MY BUCKET LIST. I LOVE THEM BUT NEVER COULD DO THEM NICE, PRACTICE, PRACTICE
Great instructions and visuals …encouragement to try again. Thank you for sharing in such details.