Thread Talk from My Sewing Machine #61

thread-talk1

Hello Friends, it’s so good to have you back.  I am passionate about wholecloth quilting when it comes to machine quilting.

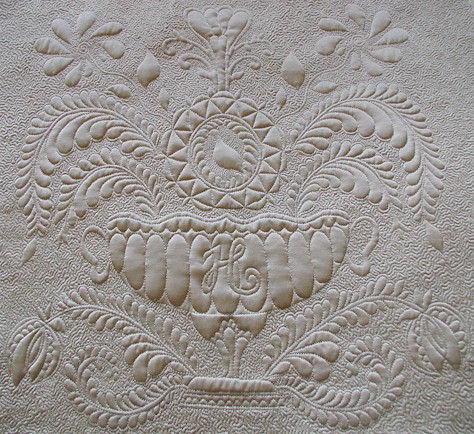
However, I am keenly aware not all quilters want to do that kind of quilting — which is PERFECTLY okay!!  I am not in any way getting on to you for not doing wholecloth quilting that oftentimes requires very dense background quilting.  The background quilting you see in the following quilt images is quilted less than 1/8″ apart!

Plus to be honest, that kind of dense background quilting probably is not conducive to be quilted on quilt tops made with printed fabrics.  So, for a while now, I have been thinking about the matter of background fillers to go with feather quilting on “printed” quilt tops that are practical. One of these fillers is my Sand Dunes filler!

IMG_9435

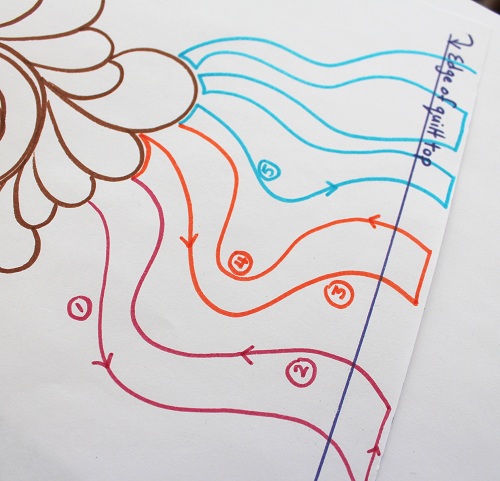
1.  So, first, we have a feather plume “quilted” here.  Click here to read about how I quilt my feathers.

IMG_9491

2.  After the feather is quilted, I picked a spot on the feather to just quilt something curvy, but somewhat graceful looking toward the outer edge of the quilt top.

So you will notice I quilted my first Sand Dune pass (#1) beyond the edge of the quilt top INTO to the batting and quilt backing portion — assuming you baste your quilt sandwich with excess batting and quilt fabric around the quilt top, like I do.

IMG_9492

3.  That’s because… it saved me having to cut my thread and restart on the pass back to the feather plume.  Notice my pass back to the feather plume is only somewhat echoing the first pass. My Sand Dunes are meant to be “liberated” echoes in the sense that they are not exactly echoed.  Another thing is that the Sand Dune passes are quilted far apart, unlike the 1/8″ or less distance in between echoes in my wholecloth quilting.

IMG_9495

Once the back pass (#2) touches the feather plume, I would then follow the quilt feather plume outline for just a little bit, and then, I would quilt toward the outer edge of the quilt top with another Sand Dune pass (#3) and so forth to complete the background quilting around the feather plume(s) on my quilt.

IMG_9497

This quilt back picture might show you exactly I meant.

I like the Sand Dunes for a printed quilted tops because this filler looks open and doesn’t have a suffocating feel on the printed quilt tops.  It is not demanding because it doesn’t require me to echo exactly, and veering off a bit on subsequent echoes actually adds to the overall textured look.

IMG_9428

I would love for you to try out Sand Dunes with your feathers — and let me know what you think.

Meanwhile, if you haven’t checked out my other posts on machine quilting, feel free to do so by clicking here.

I will be sharing with you some exciting machine quilting news in a couple of months – can’t wait!!! But for now, if you haven’t checked out my online Learn to Machine Quilt class (that covers practical motifs for beginning machine quilting) here, I hope you will do so as well.  The class is also available on DVD here.

learn to machine quilt

Thank you for stopping by, Dear Friends!  Blessings to you all!

Thread Talk from my Sewing Machine #43

Hello Friends, I hope you are doing well.  I am sharing with you a quilting trick I fortuitously discovered when I was quilting my Home Sweet Home quilt.  [I love that word “fortuitous” — it was a word taught to me by a dear Chemical Engineering professor in college when I would go see him in his office.  More often than not, he would give me the “word of the day” after he was done teaching me engineering stuff.]

If you look at the image below, you will see that I added little “what-nots” at the tip of some feathers to fill in the geometry of either square or triangle patches.

The reason I did that is because I was trying to fit rounded feather lobes into the geometry of a square or a triangle, and sometimes it’s just impossible to quilt a feather large or narrow enough to fit the quilting area and have the feathers still look decent.  So I came up with the “what-not-companion” approach.  See the below images to see what I mean…

You can see in the following the aforementioned “what-nots” in action.  You will need to study the images a bit to find the “what-nots” since the quilting was done tone-on-tone.

I hope the “what-nots” trick would come in handy for you when you are quilting feathers to fit quilting area of fixed geometry.  Notice this post does not deal with how to quilt feathers — that topic is already covered here.

Thanks for stopping by!  A huge quilty hug to all my friends!

Thread Talk from my Sewing Machine #33

Most of you know that I free-hand my feathers 97.5% of the time because of the tight deadlines I work with.   I generally don’t like to spend the extra time marking my quilt tops  — there are periods of time I would only sleep only 3-4 hours a night for a few nights in order to get a quilt done.  You get the idea.

Today, I will share with you my trick for free-handing curvy feather plumes that I use most of the time.  My goal is to always come up with tricks to still quilt with decent result within the limited allotted time I have for my magazine quilts.

I start stitching like normal, until I come to and slow down at the entrance of the curve.  You know, like when you slow down turning into a curve while driving.

I.  In order to achieve the best result, I mentally divide that curve into four quadrants, and try to keep the number of feathers somewhat even from quadrant to quadrant (#1).

II.  I also stitch much shorter feathers when I need to orient the feathers in a different directions from the one they start out with (#2).  #2 is the KEY to turning your feathers within a curve!  To pack in more feathers, you would need to turn approximately at the half “circle” – not too early, or too late.

You see what I mean?  Am I even making half an ounce of sense here?  This picture below shows the BACK of a quilt.  You will have plenty of plumes to analyze to see where my four-quadrant rule is or isn’t applied. :)

As a comparison, this feather plume does not subscribe to my four quadrant rule.  It does have slightly shorter feathers at the curves where it turns.  It doesn’t look bad.  But I am not able to pack in as many feathers, and as a result, it doesn’t look as sophisticated as the plume done with the four-quadrant rule.

So, you ask …. “What do you do if you forget to apply the four-quadrant rule when you are free-handing your feathers away?  Do you take the stitches out?”   My answer would be “No taking stitches out necessary.  I would just move on and try again with a new plume.”  If you study the picture below closely, you will see what I mean.  All the feathers are free-handed on this quilt.

Curvy feather plumes make a stunning quilting statement!  Give them a try – you will soon be addicted, like I am! :)

Happy Feathering, Friends!  In case you have missed my past Thread Talk posts on feathers, they are here, here and here.  Till next time!

Thread Talk from my Sewing Machine #29

Hello Friends!  A sick Miss Baby and a tight quilt deadline got in the  way of blogging! :(  Thanks so much for your kind words on my Candied Pomegranate quilt.  Many of you mentioned you liked the feathers… thanks!  Feathers are one of those elements that just add a special touch to a quilt.  Some of you also wrote and asked about the sizes of my feathers.  I thought it would be easier to show you in pictures:

As you can see, my feathers aren’t terribly big.  It’s harder for me to quilt big feathers on my domestic machine.  So, I generally keep mine on the small side.  I tend to have a better control on the flow of the individual feather lobes.  If you have trouble quilting your feathers to your satisfaction even after applying this principle, you might try tweaking with the size you are quilting your feathers.  Let me hear from you if that helps!  Till next time.

Thread Talk from my Sewing Machine #27

I thought I would show you my normal stitching schematic before we dig deeper into this feathery business.  As you can see from the diagram below:

1.  I work on my feathers one side at a time.  I tend to have better control of how my feathers turn out.  I do want to at some point work on doing the simultaneously feathers on both sides.  I have done it a couple of times, but didn’t find my work satisfactory.

2.  For regular “everyday” feathering, I do the backtracking shown in the diagram.  Note, the dashed lines simply means you will stitch over the same spot again to get to the point you would start a new lobe.

And now, concerning those individual “lobes”…  I think how your feather lobes look determine the appearance of your entire feather plume.  It is definitely a worthwhile investment of your time to sit down and draw out how best to execute your lobes.  Some like theirs slender, while some like theirs to be a bit more full.  I like them both, and try to incorporate both in mine when I can.

From my own limited experience, the anatomy of a good feather plume consists of:

1.  Smooth curvature on the feather lobes.

2.  The width of the feather lobes should decrease as the curvature approaches the spine.

3.  You know that curvature… make sure the smooth-ness persists till the bitter end where the feather lobe meets the feather spine

4.  I like to backtrack along my previous feather lobe until it is about halfway before starting off with a new lobe.  I find that my new lobe looks more substantial that way.

Now, how about some real life feathers so that you can spot the aforementioned principles? Being able to spot what you are looking for in your own feathers is the first step in beautiful feather quilting.  I can say that because I spent hours and hours and hours just staring at master quilter’s feathers!

I hope this is helpful to you to first diagnose why you don’t like your feathers, and hopefully begin your journey in fixing certain quirks to help you better quilt your feathers.  Stay tuned for my next Thread Talk post dealing with the issue of perspective in feather quilting.  In order to do the perspective in an attractive manner, you will have had to master your lobes!  So, get busy and get drawing, will you? :)  Thanks for stopping by.  Have a great weekend.