
SCENARIO
Some weeks ago, I spent about 13 hours total trying to get the binding to come out right on a quilt. I have since reconciled with the quilt, so I shall not name the quilt here. The situation was such that I kept getting these annoying pleats on the quilt border when I sew my binding on the right side of the quilt – because the borders were not heavily quilted, and had incurred a tad bit of slack when I was quilting the quilt center.
WHAT I ENDED UP DOING
I re-blocked my quilt, and actually did wide and short zig-zagging around the quilt edges before attaching the binding. No annoying pleats, and I thought my binding looked more crisp.
SINCE THEN…
I have been zig-zagging around the quilt edges on subsequent quilts before attaching the binding.
1. Here you see a quilt edge before being zig-zagged.

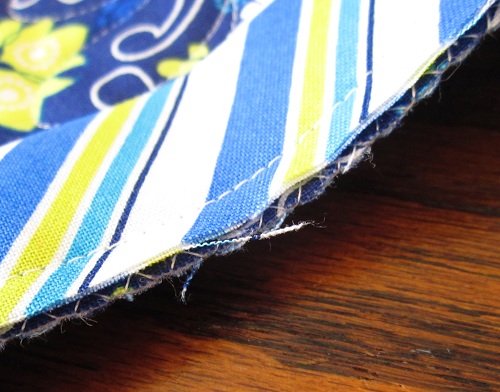
2. Here you see the quilt edge after being zig-zagged. My settings for the zig-zags are about 3.5L and 5W. I made sure the zig-zags are under 1/4″ wide into the quilt edge since I would later sew on the binding at 1/4″ seam allowance.


3. Here you see the binding being attached.
4. What I really like is the crisp corner. Here you see how it looks on the back.

And on the front…

5. I honestly don’t know if doing my binding that way is proper protocol, but I feel so much happier with my quilts since that 13-hour binding disaster marathon. The zig-zagging around the edges probably don’t make all that much of a difference in most cases, but I sure feel better about this final stretch in quilt making. And how one feels about one’s quilts goes a long way, doesn’t it?

Thanks for stopping by! I would love to hear your thoughts, and if you have any tips and tricks on binding you would like to share with the rest of us!
See you again tomorrow!

That was brilliant! What a beautiful binding! I can see where this technique would make a huge difference. Thank you for sharing a great discovery.
Not all craftsmen -women share trade secrets! That’s what’s so awesome about quilters!
that is cool. I am going to try that on my next quilt. I was happy to say that some of the fronts of my corners look like yours. I have lots of practise coming, since I have six out of my quilts to do for my twelve grandchildren. Oh, I would love to meet you in person!
Your binding is beautiful. Generally, actually always, after quilting my quilt, I will square it up but rather than cutting away the excess fabric and batting, I will mark it with the Clover chalk (little wheel type) marker. I will use this chalk line as my guide for placing the edge of my binding when machine stitching. I trim the excess fabric after I machine stitch my binding. This way I can also adjust the amount of fabric to be left so that my binding is nice and plump. I also feel that there is less stretching of the outer edge because of the excess fabric. It takes a bit longer but I don’t get ripples or waves this way. Think that I may try the zig zag method to eliminate a step:-)
that is a crisp corner Wendy…will have to try zig zag for my next project
Wow, what a great recovery – thanks for sharing your little trick. I have made reasonably tidy corners, but WOW is that last one CRISP!
My Mother always serged around her quilt before putting on the binding. It came out beautiful.
Great solution…I will have to keep that in mind.
Wow! That is probably the crispest looking bound corner I’ve ever seen! And now I’m craving blue fabric to quilt!
Wow…I have something in common with a superstar! I have been zig zagging my quilt edges before binding for about 2 years! I much prefer the results!
That is an amazingly crisp corner on this beautiful quilt. Love the binding fabric! Thanks for sharing this and making my day by knowing I do something like you! :-)
what a great idea! gonna try it!
I love that idea too. I’ve fought w bindings too, just thought it was the quilts way of saying GOODBYE…. GIVE ME AWAY!!!! LOL, I sometimes get too attached to quilts that are going as a gift.
I actually put my quilts (all 4 of them!) through my overlocker before I bind them. Great if you can hold of one. It makes a really rigid edge and stops any fraying.
Love that tip! Thanks for sharing and always teaching me new things. (p.s. I was so sorry that I missed you at the Rogers Sewing Center. I heard it was terrific, saw the pictures… and YOU LOOKED MAVALOUS! Hope you are back here soon, and that you had a great visit with old NWA friends.)
Hello Wendy! Been making quilts for 35yrs now. But never heard of that tip. so thanks! It is a good one. We can always use a new discovery no matter how long we have been quilting. BTW….the blue quilt sneak peeks are lovely. Can’t wait to see the whole thing some day. Your bindings are great! Love the stripe for a binding choice.
donna j in ks
Terrific info! Thanks for breaking it down and providing easy-to-understand illustrations. By the way, I enjoyed your recent class at Rogers Sewing Center!
I’ve been using the zig-zag technique for a while now but thought in a way I was cheating because I had always heard that the judges liked seeing the big fat bindings; though my quilts would never show up to be judged!!! Truth is I think putting on the binding is alot easier this way, its easier to make sure all layers are caught by the stitching and the bindings look alot neater.
Great idea! I’ve never had a corner quite as crisp and neat as yours, this may do the trick!
I serge my edges. Yes it helps stabilize the quilt before adding the binding. I also apply a piped binding.
I LOVE the tip! Thank you. My tip is to NOT press your binding strip in half before sewing it on – just fold it. It makes the outside edge rounder and eliminates one pressing step – bonus for me!
You should always baste around your quilt before you start quilting. As a longarm quilter, I start by basting each side first. If you use a half inch basting stitch (meaning your stitch length is as long as you can get it, or 1/2 inch long) it is easy to remove if you need to. It holds your layers together so when you quilt away from the edge it won’t move and it holds it in place later for the binding.
I like the mitered corners to be sewn closed. I know you can do that by hand, but I don’t want to take the extra time for it. So, I put binding on a quilt in such a way that each of the four corners has a MACHINE SEWN miter. Love this method SO much! I have a tutorial on my blog, in case you’re interested.
Thanks for the tip Wendy! Funny, I just did that on my last quilt. I didn’t know if it was proper but it sure works well. I had a problem because I can’t hand stitch my binding on the backside and opt to s-i-d to secure the binding to the backing. What happened on a quilt I wash alot is that I hadn’t caught enough of the backing underneath the binding and the fabric started to fray. So when I did an overcast stitch on the edging, everything stayed much more secure. The backing doesn’t shift or curl. Much nicer to work with!
This is too funny I am sewing a binding on a quilt that is 90×90 and was wondering how you do it. LOL you read my mind.
Love how you did it. Next time I will try it as I am 1/4 way around hand sewing it down to the back now.
Bunny
Magnificent tips and very simple to comprehend. I’ve very little doubt that it is extremely hard to apply this knowledge in the real world. What’s the secret formula for creating wealth? This often motivates us to take steps that will create happy chemicals in our brains.
Hats off to your patience and determination!!
I merely stitch a 1/8″ seam around the edges of the quilt before starting to attach the binding. Like the zigzag edge, it just seems to hold the “sandwich” together better and make the binding much easier to attach. And…YES…I’ve had a binding marathon a time or two prior to learning this technique!
Never thought to zigzag the edges down…clever!
I have heard of prize winning quilters that glue their binding to the edges before sewing them down so they are extremely straight…not my cup of tea!!!!
WOO HOO! I think you’re onto something, just from looking at that gorgeous corner. I am definitely going to zigzag around the edge of my next quilt! Thanks for sharing your discovery – its why I always have you in my inbox!
I always do a line of stitching around a quilt about 1/8th of an inch from the edge before starting to quilt it.
Sounds like a great idea to me!
I am going to try that…I want my binding to look really good, so that idea may help.
I had thought of doing that Wendy, but never really tried it because I believed it would just add time to the job. But if it would help it would be so worth it! One thing I think it would help is the way the edges don’t stay stiff and sometimes when sewing down the binding they “smush” up and make a thinner binding in some areas rather than laying flat and giving and nice, even binding all the way around. The zig zag would give added strength to that edge and hold it true. I’ve gotta try it on my next binding! Thanks for sharing!
Your binding looks perfect. I’ll have to try that!
I always baste around the edges of my quilt before I quilt it. Well. Almost always. I get so annoyed with myself when I forget. It seems to help me do a neater quilting job. :-)
I always baste around my quilt too, sometimes with a zig zag and sometimes with a straight stitch. Things just seem to go better for me if I do. I don’t know about proper, but I think whatever works to turn out the best product without tons of frustration is proper!
Great idea. I’ll give it a try. It should keep that corner from folding over on me when I attach the binding. Thank you.
Excellent idea–thanks for sharing ! Begone, smushy corners !!
13 hours – OMG! I think I’d have given up! But your binding in the photos are gorgeous! I like the zig zag idea, I think I’ll give it a try!
Could you tell me the weight of the thread you use for the top quilting? Thank you, Kathy
I have always done my binding the same way….zigzag the edges first so they don’t come undone and then sew the binding on….it is beautiful—and the corners are just perfect! That’s the way I like mine too!!!
I also baste the edges of my quilt before I start quilting. Then when I put the binding on, it has a nice, tight edge. I might try the zig zag though, to see if there is any difference. Thanks for sharing your beautiful results!
Pingback: Mediterranean Mosaic: Sneak Peek! « Ivory Spring
Beautiful binding and technique Wendy – Its really a good way to do it .. Must give it a try
The first thing I do when quilting a quilt is to go around the edges; about 1/8in form the raw edges with a walking/dual feed foot (and straight stitch). It has a similar effect, but also stabilises the edges, helps keep the quilt squared, sops holds any seams from pulling apart, and means I can get a heap of the basting pins out of the way at the beginning.
There are those instances where this happens for me….the quilt center has a bit more density than the border resulting in the slight waviness/excess. I have had success with evenly cutting away the excess batting & backing (squaring the edges), then I flip the quilt over so the backing side is up, I stitch all layers from that side (allowing the feed dogs to take up the existing slack). I’m not sure if I described this well enough, or not. Anyhow, the feed dogs are the key “helper’ in this dilemma.
Thanks so much for sharing this technique, Wendy. I’ll definitely try it on my next quilt.
I am going to be doing this tomorrow. Thanks for the reminder.
Hmmm… I have serged the edges of the two baby quilts that I made with Minky backing, because I used packaged satin binding instead of narrow quilt binding and I know that satin binding gets loved loose with time. Now that I’m reading your post and others’ comments, I’m thinking that maybe serging wouldn’t be a bad idea for every quilt? Also, I feel like I might have read a recommendation somewhere to baste the edges of the quilt before putting binding on, but using a walking foot (I confess, I don’t do this). I wonder if this would have the same effect as your zigzag technique?
It IS reassuring to learn that even quilty goddesses like you still struggle with something occasionally! ;-) I’m glad you worked the kinks out, and thanks again for sharing so generously with your blog readers!
Pingback: Joyce says it works – it really must! « Ivory Spring
Your bindings look very smooth. I was wondering if you could tell me what size your binding strips are and do you stick to the 1/4 inch seam to attach it? Thanks for sharing all that you do.
Hello Duane,
I cut my binding strips at 2 1/4″, and yes, I do stick to the 1/4″ seam allowance.
Thanks for stopping by and commenting.
Wendy
I zigzag around the edges too, but I use fusible thread in the bobbin. Then when I wrap the binding around to the back I can fuse it in place before stitching it down.
Pingback: Aurifil 2016 July Designer of the Month Wendy Sheppard | AURIbuzz
Wow, wish I had known this before I put the binding on my first quilt, will have to unpick the border as I was so scared it would look slack so made it a bit too tight so the inside bulges! Darn but a good thing I know now to first zig zag the edges and try again, many thanks!
Thank you Wendy, I noticed most replies are from 2013, I haven’t always gotten those nasty tucks but last couple of years I have, so I will try your zig zag on my lg table runner I’ve been procrastinating on doing because of the tucks I get. I have looked through the 2021 fall issue of primitive quilts is this info in there, if not it should be.
Thanks again