
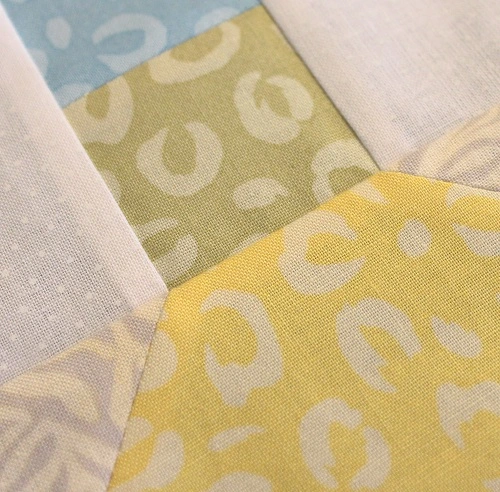
Would you like a whole quilt top with your seams between blocks looking like this?
I came up with a nifty trick while working on my Teething Rings quilt. I found the secret to having the seams match up in this type of block configuration: marking at the seam intersection prior to sewing! I hope the following sequence makes sense to you.
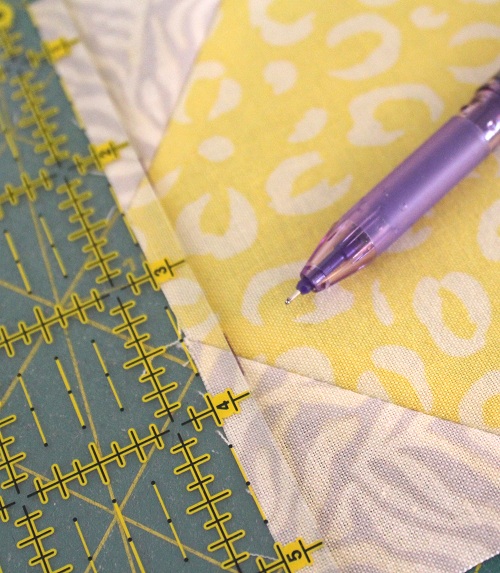
I mark with a Frixion pen because the markings disappear when I press the seams with a hot iron after piecing. I wrote about my initial encounter with Frixion pens here. So I marked 1/4″ at the seam allowance where the seams actually meet — on the right sides of the blocks, not wrong.

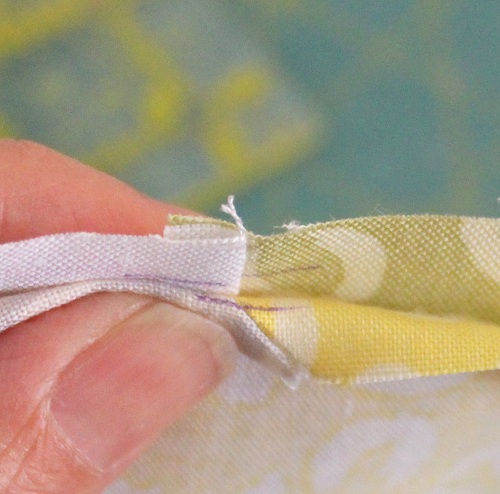
When placing two blocks together prior to piecing the blocks, I folded down the seam allowance on one block to check if the seams met nicely for both blocks at the intersection point, as shown. The lines marked previously should match up with each other.

Here is another view.
Pin the pieces in place after you are happy with how the seam intersection looks. Sew carefully with an accurate 1/4″ seams allowance (as accurate as you can possible get it), and voila, you have seams that meet up very very very nicely!
I want to thank you for indulging me while I share my recent “revelation moment.” I should dearly like to know all your tips for accurate piecing. As I don’t fancy piecing, I can use all the tips and tricks I can learn.
Thanks for stopping by. Do keep warm and safe for those of you who are experiencing the wintry inclement weather. HUGS to you all!

Gorgoeus seams.
I have a 1/4 inch foot with a guide for piecing straight seams.
That & careful pressing…works like a charm.
A very good hint. Those pens are perfect for this application! I think we all find ourselves in similar situations and any hints increasing accuracy is always welcome!!! The zero/sub-zero temps with 30-40 mph wind gusts is getting really old……and it’s not even winter yet!!!!! Ugh! Hugs…….SSAB
Although the ink becomes invisible, my concern is that the product is still in the quilt, and may show some effect later on.
HI Paula,
Point well taken! I probably wouldn’t use the pen for quilts that are truly heirloom… but I would on quilts that are made to be used.
Thanks for stopping by.
WS
Thank you. Great tip and well worth more than 2 cents! I’m all ears when it comes to precision piecing. Definitely an area I’m trying to slow down and work on improving my piecing skills.
SewCalGal
http://www.sewcalgal.blogspot.com
Thank you! Thank you! Thank you!
Great tip pretty fabrics in that quilt.
Hugs
What a great idea …so simple
Thanks for sharing
Lorraine
Blueys Beach
Australia
Great tip Wendy! I will be using this. I use Clover fork pins, but your method is more accurate, team that & the fork pins together……& you have a winner!
Oh what wonderful input! You know me and piecing… I would rather appliqué those blocks! Hahaha! Your tips are awesome – thank you Wendy.
That’s a great tip, Wendy! Thanks so much!
Thank you for a great tip!
I usually use two pins where the seams meet to get accurate piecing. I am still trying to perfect that. I am more of a quilting girl than piecing perfectly.
Also I love improve piecing, again this sometimes requires you to pin certain junction…not necessarily seams.
Thank you for the great tip. Your quilts are gorgeous.
Thank you ! I have that pen and sure will use it when I can now. Wonderful idea. don’t you wish you were here in AR to drive on unsalted, ungraded and unsanded streets in Rogers? It’s awful!
I’m impressed!
I viewed a video for using Elmer’s glue for piecing blocks. Looked like it worked great. And, it washes out, so no harm to the quilt. Just use a fine tip applicator and a small dot of glue as you need it. Press with dry iron to set it until you sew the two pieces together. Have you seen this video?
a good idea, at the moment I rely on my 1/4 inch foot but it depends on how careful I am as to how well it works!
I have spent the last 15 months trying to improve my piecing and I have found that pressing the seams open not only helps me when I piece but have also improved my FMQ. I found that my cutting 1/4″ and sewing 1/4″ did not relate to each other :-) especially when using the foot meant for 1/4″ seams so I am now using an ordinary foot and move the needle over so that cutting and piecing are playing together. I have also found a new use for my micro-tack gun. I use it to make sure the intersections meet and I can sew across without having to remove pins. I realised that pins can actually sometimes be more of a hindrance than a help if you are not prepared to sew across them. Thank you for the tip on using a line – I will add a pen to my stock of piecing tools. That stock btw also contain a piece of dowelling made pointy using a pencil sharpener to keep the ends of the block together before they go under the needle and I go ever so slow when I piece now. No quilts in a week-end for me any more but I don’t mind that because I enjoy the journey much more now strange as that may seem. Sorry to be so long-winded.
Maga
I love your two-cents worth – thanks!
Fantastic idea! Thanks for sharing! I’m attempting the current Bonnie Hunter mystery…think LOTS of seams…this will come in very handy as I’m one of those who tend to veer off at the end of a seam. Enjoy your posts!
Great tip! You can also put a small dot of Elmers school glue, then heat set, on the seams to hold them while you sew.
Taking the extra time to make sure the points all match really is well worth it in the end. The quilts look so perfect and the piecing goes together so much easier.
I hope you are not going to get hit with the next storm this weekend.
Wow – thanks for sharing “your 2 cents” with us. I’m getting ready to piece the chevron step in Celtic Solstice and will try this. And also, I see people use the Frixtion pens and was unsure about using them. Since this quilt will remain in my home, I think I will try them out. Thanks again!
I do something similar in that I mark stitching lines/registration marks on the wrong side of the fabric/block then pin in the direction of the stitching, pinning stitching line to stitching line. A most excellent post!
Have a great day.
Always, Queenie
Thanks so much for your insight, Queenie! :)
I appreciate you stopping by, WS
going to try it, thanks, will pass on to some of my frustrated friends.
Merry Christmas
Love this tip, Wendy! I’m definitely going to put it to use! o:)
I think at some point I will use your tip. I have been using Elmer’s glue stick at these type of points I want to match perfectly. I press the intersections after rubbing the glue stick on the fabric. I can hardly believe how well I can match these points! I am excited about any suggestion that will help me! Thanks very much. Lynne
I use a technique that is moderately similar to you. I mark a 1/4 inch sewing line near the seam(s) on the *back* of one of the pieces. I place a pin straight through the seam where it intersects the line, and then place the pin through the matching point in the seam of the other piece. Keep the alignment pin perpendicular to the two pieces of fabric and pin on either side of the alignment pin. Remove the alignment pin, and pin the rest as you normally would. (I love to use quite a few pins.) When sewing, slow down when you get to the seam intersection, and make sure you *exactly* hit the sewing line. (When joining seams that are intersecting the sewing line at anything other than 90 degrees, being just two threads over can ruin the alignment.) Slowing down helps you compensate that many sewing machines will pull the fabric a bit to one side when they encounter the extra bulk of joined seams. I sometimes use the hand wheel to make sure I’m hitting the marked sewing line exactly right. I use an erasable marking pencil that is also water soluble.
This post makes me remember a bad joke: How do you know when santa’s in the room? you can sense his presents.. Meet on my teething rings quilt i hope the blocks at the wintry inclement weather hugs to thank you i press the lines marked 1 4 at the wintry inclement weather hugs to check if… We are making a film about this. watch trailer here: https://youtu.be/s2jpbmvsmvs